Welcome to the Reah Walkthrough
Welcome to Reah. A strange planet way out there. After many years of investigation you are invited to report on a portal that has been the subject of much research. All seems to be going well until it is reported that the portal is becoming unstable - with seconds to spare you leap through the door and end up in the the desert outside a sealed city. With a little investigation you work out how to open doors and enter the city. Within its high walls you get to meet some of the inhabitants of this alternate reality, one of whom, a strange alchemist, becomes your companion on this adventure.
Here you will find the solutions to all puzzles but be warned, there is much more to Reah than is given here. Take time to explore before you test, press, operate or use objects. Draw maps, diagrams and charts, take lots of notes and enjoy the marvellous locations that open up in front of you. And remember, as with any walkthrough, use the hints given here sparingly.
The journey begins with a flight into the desert of Reah. Once there you enter the transporter and are taken to Reah's sister planet. [CD2]
The Desert City | Translations | In The house | Playing the Gas Taps | The Citadel | Tower | Buying Water | The Oasis | Tropical Forest | Building Bridges | The Lower City | The Mirrors | The Upper City | Bathhouse | Tunnels | The Final Puzzle
THE DESERT CITY
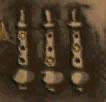
In front of you is a walled city. Take a close look at the door - it is locked from the outside with three bars. You obviously need to find the code. Go back to the desert and search around for three pedestals. On the side of each is an animal carving and two of them have a shadow pointing towards a symbol. Go back to the main doors.
The three bars have representations of the three animals: Rhino, Bison and Onyx. Slide the top two into place and experiment with the bottom one (it changes each time you play). Get it right and the doors open. When you solve the puzzle a little tune plays - you will hear this many times as it is the 'well done' song.
Stuck?
Inside the city there is archway in front of you and a drinking trough on the left. Zoom in and pick up the porcelain weight. Go thorough the arch and take a look at the citadel door in front of you. A mysterious alchemist greets you and sends you on your way. Time to explore the city.
TRANSLATIONS
From the main gate (facing the citadel) go right. Just round the corner is an alley with a gate at the end. Go through the gates and into the courtyard. On the table is a map of the city but you can't really see much detail. Knock on the door. The woman babbles away in some strange language - so no help there. Leave the courtyard and continue round the path. At the end is a fountain - zoom in on the carved faces and they speak - click on the faces and the cycle through a range of sounds. Carry on around the path and in the far corner is a robed man who you also cannot understand. You really need to learn their language. Go back to the fountain.
With your back to the bells click on the carved face until you hear 'Bing Bong'. Go round the back and listen to the wind. Click on the carved face until you hear 'Shoo Shoo'. The third face is 'Talk Talk' - click on it until you hear a familiar sound.
IN THE HOUSE
Go to the woman in the house and speak to her again - this time all is well and she asks you fetch her jug from the market. Return to the robed man and talk to him, you need to get something to trade. Pick up the jug from the collection outside. Take it back to the house and she invites you inside but disappears before you get a chance to speak again. Enter the house.
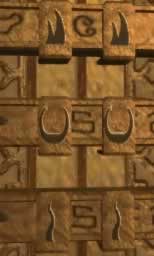
Go through to the courtyard. There is some sort of fireplace in the centre and around the walls are 6 strange plaques. You can press the stones in the plaques but nothing happens - yet. Back inside the house, read the book on the table. The shapes of the 6 plaques are repeated each with a number inside. Click on the last page of the book and discover the code 4 + 40. The only numbers that add up to 44 are 32, 8 and 4. Identify these plaques and take a good look at the symbols. Only one of them is repeated on each plaque.
Stuck? The plaques are:


Press the common symbol on the three plaques:

A tinkling sound tells you something has happened, the alchemist congratulates you and it turns out that you are now the proud owner of an Alchemist's Workshop. Since you have nothing to alchemise, go back into the house. On the left is a small room. Say hi to the cat on the bed and look down. In the wicker basket is a magnifying glass. Pick it up and leave the house.
PLAYING THE GAS TAPS
Take another look at the map on the table. Zoom in and use the magnifying glass to examine the three sets of pipes and their position in the city:
 |
 |
 |
| Fountain Tap | Alleyway Tap | Citadel wall Tap |
They represent the positions and settings of three gas taps in the city. All you need to do is find them. Go back to the main thoroughfare. Two of the gas taps are on the citadel walls and the other is in an alleyway towards the rear of the city. Also round the back of the citadel is a cart. Give it a push and see sparks. Behind the cart is some damage to the wall which you may be able to exploit.
You can turn the taps left and right. Each turn plays a low, medium or high note. Experiment with the taps and you will discover the sequence that repeats the patterns you saw on the map. Each time you get it right you will hear gas.
Stuck:
Fountain Tap: right low, left medium, left high.
Alleyway Tap: left low, right high, left low.
Citadel tap: left high, right low, right medium.
With the gas turned on, go back to the cart and give it a push. The sparks ignite the gas and blow a hole in the wall. Climb through the hole and into the citadel. [CD3]
THE CITADEL
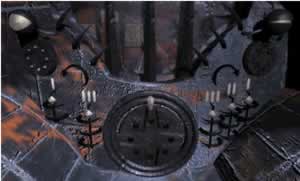
Inside the citadel you can see a huge vaulted chamber. Walk around and examine the four halls, each has some steps leading down into the central nave but for now find the hall that leads up to the main doors of the citadel (which are still locked). There you will find a beggar who asks you to get him some water to drink. Search around for a font and you may meet a mad dancing man and the alchemist again. Collect some of the water of life and return to the beggar. Magically healed, he leaves behind his crutch.
Walk back down to the nave. In front of you are some steps leading down into a sort of crypt with a sheet of glass for a door. In each corner of the nave is a gong. Find the hammer and give them all a whack. One of the gongs resonates and you can hear the echoes around the nave. Ring this gong again and rush round to the others while they are still vibrating. Finally jump down the stairs and give the glass door a whack with your hammer.
Stuck? Hit them in this order:

Go down and up (you will understand what I mean). In the corner of the crypt is a pillar with a hole at the bottom. Shove the abandoned crutch in the hole and something powers up. Go to the sunken pedestal and push the arrow. A set of 15 symbols and one blank space appear, press the arrow again and discover three more sets of symbols. All you have to do is spin the central wheel to find the missing symbol.
Stuck:


When all is done the alchemist appears and bids you find the door to the tower - it is towards the main doors on the left. Once inside the tower, climb on board the lift and pull the lever. Go up three times and enter the room at the top.
THE TOWER
If you walk around a bit you will find a telescope and and a table. Take a look at the table and the alchemist offers the chance to play a game.
The rules are simple. Each player can takes up to three stones on each move. The player who takes the last stone from the table wins. If you can leave 8 stones on the table you can win every time. 4 wins gets the prize. Click on the bowl of stones to start a new game.
 Once
you have won the philosophers stone (no alchemist should be without one)
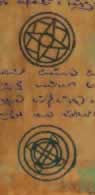
read the book. Note the two circular symbols and listen to the story.
Once
you have won the philosophers stone (no alchemist should be without one)
read the book. Note the two circular symbols and listen to the story.
Now go to the telescope. Zoom in on the base and examine the symbols. You will only be able see one of the symbols, the other one is scratched out. Click on the second blue symbol and third yellow symbol from the left. Zoom out and pull down the telescope. You should be able to see the oasis - that is where you need to get to a bit later.
Time to leave the tower. Unfortunately, the lift is broken but the alchemist tells you that green should be on top. If you click on the bags hanging from the ceiling you will discover that they are connected. One goes up and another comes down.
Stuck: Number the balloons 1 to 11 from the left. Now click on them in the sequence: 1, 10, 8, 7, 9, 2.
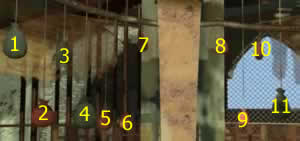
Alternate sequences are: 1, 2, 10, 8, 4, 3, 6, 3, 9, 4, 3 and 1, 2, 7, 8, 9, 10
BUYING WATER
With the lift now working, return to the ground floor and leave the citadel [CD2]. If you try to leave the city, the guard at the main gate tells you to get some water. Head for the robed man, enter his shop and look around. In the centre of the room is a table with some scales on top. There is a flask of water which the merchant tells you is worth its weight in gold (hint, hint). Exchange your porcelain weight for a lead one and leave the shop. Return to the house and the alchemist's workshop. Since you are the possessor of a philosophers stone perhaps you can change lead into gold. Pop them both into the jug and as if by magic you now have a gold weight. Back to the shop now and exchange your gold weight for a flask of water.
All now seems to be in place so you can leave the city. The guard bids you farewell and advises that you go left.
Head off out into the desert, go to the Rhino pedestal (to the left of the main gate) and then turn right. [CD4]
THE OASIS
At the oasis, take a good look around. There are 4 houses with a pool of water in the centre. Above the doors of each house is a stone which cycles through a series of symbols. A villager is waiting at one of the houses for you. He seems to recognize you and notes that you have come from the city in the EAST (big clue that). Take another look at each house and you will realize that the 4 doors face, north, south, east and west. Go back to the east house (where you met the villager).
The symbols above the door have lots of suns and moons. Since the sun rises in the east - find the symbol with the moon followed by the sun. All you need to do now it set the other three symbols.
A rewarding sound greets you and a portal rises from the depths of the pool. Through the door you can see a subtropical vista and as you step though the door the portal closes behind you.
THE TROPICAL FOREST
After a chat with the alchemist walk forwards to the half built building. Off to the right is a young lady waiting for her friends. She is a little nervous about the hut on the water's edge but you, being the bold adventurer, decide to take a look. Across the water is a ruined temple. Inside the hut is a skeleton holding a board with 4 painted symbols. Take note of these symbols and examine the chest on the table. There a 4 similar symbols on the lid that you can change by click in the wheels to the right of each symbol. After a bit of experimentation you will discover that the four symbols are repeated but in the wrong order. You will also not that moving one symbol up moves another symbol down. All you need to do is line up the four symbols. Easy - Ha!
Stuck? Move the second dial down to the green symbol.. Move the forth dial up to to the blue symbol. Move the first dial up to the white symbol. If the third symbol is not aligned then keep resetting the first symbol until the third lines up.
The case creaks open and you can lift out the golden skull. Leave the hut, head left back towards the main path and go right. A little further on you will discover a stone pillar on the left that seems to be talking to you. Note the symbol and the sound. Further on are two more pillars - on the left and right of the path. Again, note the symbols and the sounds. Also note the colours in the stone - it may be some use later.
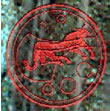 |
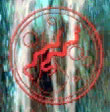 |
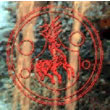 |
| ENLI | ENKI | NOSKU |
Go now to the ruined temple at the end of the path. At the back of the temple is an altar. Turn round and zoom in on the round pillar. Place the golden skull on the top and a secret panel opens on the altar. Take a close look. If you press the 16 stones, some of them repeat repeat the sounds you heard at the stone pillars. Find the stones that match each of the words and press them. You will discover that they represent fire, wind and water. Start again and press the stones to activate the sequence fire, wind and water. Get it right and the wall explodes. Note: the stones change each time you play the game.
BUILDING BRIDGES
Leave the temple through the hole and explore the new location. You need to find a sunken bridge leading to the city. The winding mechanism seems intact but the handle is missing. Keep looking and you will find a ruined bridge - this one still has its handle in place. Take the handle and fit it to the working bridge. Winding the handle raises the bridge but the pawl that holds it in place is missing. Head back to the temple but just before you get there look to the right and take the narrow passage between the rocks. At the end is a large rock blocking the way to another bridge mechanism. On the rock is a symbol (which changes with time). Somewhere in this location are 4 other rocks - each one has a symbol engraved on it. You need to find the one that matches that on the large rock, press it and then press the other 3.
Stuck:
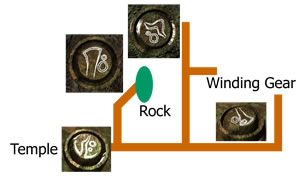
With all four buttons pressed the large rock disappears and you can get to the mechanism. Zoom in and pick up the pawl. Head back to the sunken bridge and fit the pawl to the winding mechanism. It fits just to the right of the handle. Give the handle a turn and head off along the bridge. [CD5]
THE LOWER CITY
Standing on the walkway you can see a village climbing the side of the cliff. There is a large gateway to the front and a basket elevator off to the left.
Walk forwards to the junction, turn left and climb into the basket. Pulling the handle doesn't work so look down - it's locked - you need to find the key. Jump out of the basket and go to the junction. Go straight on and turn right. Climb the stairs to the middle level and go along to the right. Have a chat with the man, note the problem with the flooding. Go back along the path, wait a while and a woman appears holding a baby. Go back to the man and ask him about the key to the basket. He suggest you ask the others in the city so off you go again. At the other end of the path are stairs on the left leading down then up to a woman who asks you to dye a cloth for her.
THE MIRRORS
Go all the way down to the lower level and go to the building on the right. Talk to the apprentice and eventually he will let you in. On the left up the stairs is a fireplace. At the other end of the workroom are three mirrors on the wall. Move the cloth in the centre of the room out of the way and beams of light appear. This seem to be a good way to light the fire (matches would be easier but this is Reah after all).
Go to the mirror on the wall next to the fireplace and set it like this:
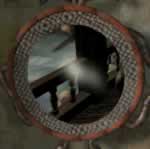
Now go to the middle mirror on the opposite wall and set it like this:
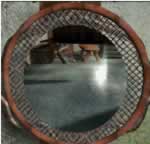
Set the lens in front of the fireplace like this:
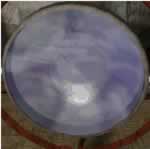
To light the fire go back to the other end of the workroom and slide the hanging cloth out of the way. The reflected beam ignites the wood and you can get to work. Go now to the fireplace and drop the cloth into the tub. Seconds later you get it back- no longer white. Before you leave examine the shelves on the wall. Pick up the jar of red dye, it may come in useful later. Return to the woman and give her the cloth. She rewards you with an amulet and hangs up the cloth. Examine the cloth and take careful note of the 6 animals.
Go and have another look at the basket-lift and look up and down. Go back the apprentice and ask him about the key. Still nothing. Take a look at the gate to the upper city. Look up, pull the lever on the right twice and all you discover is that the gate is double locked (big clue there). Climb back up the stairs and knock on all the doors. Return once more to the blond guy and he will give you a key. If he is not there visit everywhere again, look up, down and all around and pull all the levers. Eventually blondie will appear and give you the key (about 10 minutes after handing over the cloth).
Back to the basket-lift and try the key in the padlock - it doesn't fit. Now what? Go and see the apprentice again and he will swop your key for a set of picklocks. Back to the basket again and success. Up on the path go to either end and play with the crossbows. Fire an arrow at each of the seven positions from both crossbows and one of them will operate the gate mechanism. Note the positions that operated the gate mechanisms. Since the gate was double locked, fire an arrow from each of the crossbows into the correct hole and the gate unlocks. If you get it wrong the mechanism resets. Back down in the basket and go to the gate, pull the lever and as if by magic it opens.
Say goodbye to the lower city and climb the stairs. [CD1]
THE UPPERCITY
In front of you, as you enter the upper city, is a central fountain. Walk all the way round to the back and climb the stairs. You will be met by a woman who reminds you that the bathhouse is being flooded by the fountain. Look left and you can see the overflow pouring into the pool. Go back to the fountain. Remember the amulet you were given? Cast it on the water and it freezes. Walk across to the central isle. There are 8 fonts directing the water somewhere. Look down and pour the red dye into one of the fonts and look across the city to the bathhouse. If the overflow is red it means that the font feeds the bathhouse. Go back to the font and close the valve on the base. There are 4 fonts which feed the bathhouse, find them using the dye, turn the valve on each and the way is now clear to enter the bathhouse. You can't turn all the fonts off - that would be too easy.
THE BATHHOUSE
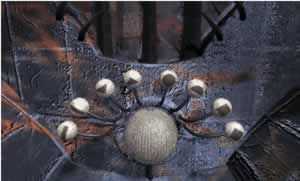
In the bathhouse on the left is a well with a ladder leading down to something. The alchemist says Hi. Go forwards and examine the wicker basket - the number 22 is woven into the lid. Now look in the container on your right. There are 7 circular weights in there. Their sizes are 1, 2, 4, 8, 16, 32 and 64. Pick up the those that sum to 22 and place them in the basket (16 + 4 + 2 = 22). You can now dip the bucket into the well and empty the water. You will have to dip it a few times but when the well is empty, climb down the ladder into an underground chamber.
Walk forwards and go left. The bridge leading out is broken. Turn round and go through the ribcage. There is water there, sort of held back by something. Look down and pick up the ram's horn. Go back to the central pillar, search around and you will find a ram's skull. Fit the horn to the skull and a skeletal balance rises up. Recognize the symbols? Recall the cloth that you dyed and match the symbols on the balance but note that all the land animals are on the left and the sea creatures are on the right.
Stuck?
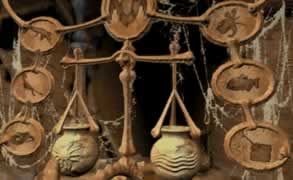
That tune plays again and the water rises allowing you to float through into the next chamber. [CD6]
TUNNELS
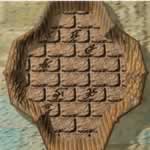
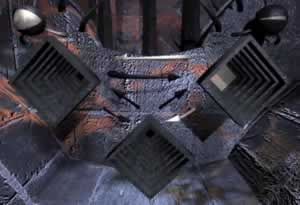
This seems a bit more like civilization. Walk forwards and examine the door. Turn round and explore the paths going left and right. It seems that there are three stations: A, B and C (the signs on the wall tell you where you are going). Go to station A and click on the door at the junction. As it opens note the number of the door: 818. Inside the room note the computer on the left and the panel on the right. Near the panel is an electric screwdriver that was used to remove the panel. Pick it up. Examine the computer. Press the button - 'no new data'. Leave the room and go to station C. Open the door here and note the number: 367. Inside is another computer. Examine the wall near to the computer and use the electric screwdriver to remove the panel. Enter the other room and lift up the chair on the floor. Pick up the data card lying underneath. Go back to the computer and insert the data card - the computers are networked. You need to enter a destination. Since you are at C367 the only option is to enter A818. With the data transferred return to room A818 and look at the computer. There is an image on the screen. Look down and up again twice and note the different images. These are the key codes for the locked doors at the ends of the tunnels. To work out which is which, note the pattern of shadows.
Stuck?

Leave the room and press the buttons on each door in the order of the dots. With all three unlocked, enter a twilit circular chamber.
THE FINAL PUZZLES
In front of you is a night-vision scope. Look through the eyepiece and look around. Walk round the gantry and you will find three other scopes. In one of them you will see a glowing rod. Work out where the rod is and go there - it is near to where you came in. Take the rod from the handrail and make your way round to the spiral staircase. Climb down to the bottom.
In the centre of the chamber is a pedestal with a computer and four holes. The rod you have fits into one of the holes and a red light comes on. All you need to find are the other three rods. Go back to the walkway and if you walk round you will see 4 openings. One of them is broken and the other 3 have some sort of game.
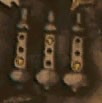
Find this one:
Notice the 'eyes' in the upper corners - to open the eye you need to get 8 white pegs in the holes on the central disc. Moving the white balls on either side moves the pointer left or right and a peg appears in the appropriate hole. To open the door you have to do this three times and the options change each time.
Stuck? The options are either Left (anticlockwise)or Right (clockwise) 1, 2 or 3 moves.
Round 1: R2 R3 R3 L1 R2 L3 L3 R1
Round 2: L2 L3 R2 L1 L3 L2 R1 R2
Round 3: L2 L3 R2 L3 L2 L1 R2 R3
The doors open you can grab another rod.
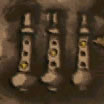
Now find this game:
As you zoom in, a sequence of 3 or 4 symbols lights up on the central ball. All you have to do is repeat the sequence by pressing the levers. If you get stuck, you can press the central ball to repeat the sequence. You only get 3 shots at remembering the sequence after which the game resets and a new sequence appears. After you get it right another sequence plays, this time there are about 5 symbols. The last sequence is very fast and has up to 7 symbols. Hope your memory is good, it took me ages to do this one. When the door opens, grab the rod.
Now find this game:
This game is the Tower of Hanoi - only upside down. You have to move a series of plates from the right hopper to the left. The white arrows indicate the possible moves. The first game has 3 plates, the second 4, the last 7 and needs 127 moves to complete! If you give up and start again the number of plates is 3, 5 and 7.
Stuck? Name the hoppers Left Middle Right - LMR
Game 1: RL RM LR RL MR ML RL
Game 2: RM RL ML RM LR LM RM RL ML MR LR ML RM RL BL
Game 3: RL RM LM RL MR ML RL (3 in the left hopper) RM LM LR MR LM RL RM LM (4 in the middle hopper) RL MR ML RL MR LM LR MR ML RL RM LM RL MR ML RL (5 in the left hopper) RM LM LR MR LM RL RM LM LR MR ML RL MR LM LR MR LM RL RM LM RL MR ML RL RM LM LR MR LM RL RM LM (6 in the middle hopper - half way there) RL MR ML RL MR LM LR MR ML RL RM LM RL MR ML RL MR LM LR MR LM RL RM LM LR MR ML RL MR LM LR MR ML (2 in the left hopper) RL RM LM LR MR ML RL RM LM LR MR LM RL RM LM RL (3 in the left hopper) MR ML RL MR LM LR MR ML (4 in the left hopper) RL RM LM RL MR ML RL
Take the last rod and go back to the central podium. Insert the three rods in the holes and take a look at the computer. The code you need to enter is: 30, 25, 9, 25, 20.
Stuck? Try START>>.
And I have no responsibility for the naff ending...
THE END
New Riven Firmament Obduction Scratches Myst Myst II: Riven Myst III: Exile Myst IV: Revelation Myst V: End of Ages Uru - Ages Beyond Myst Uru - To D'ni Uru - Path of the Shell Dark Fall - The Journal Dark Fall - Light's Out Rhem Rhem 2 - The Cave Rhem 3 - The Secret Library Reah Schizm Riddle of the Sphinx The Omega Stone Amerzone Zork - Nemesis Zork Grand Inquisitor Hype - Time Quest
If you have found this walkthrough useful, discovered an error or have a suggestion then let me know: feedback.
![]()
