Welcome to the Myst IV Revelation Walkthrough
Part four of the Myst series. Not so much a sequel but more a continuation of Myst with links back to both Riven and Exile. It really is a beautiful game and one that can be played in many ways. This walkthrough will take you through one of those ways. Only those parts you need to complete the game are covered, the rest you will have to discover yourself. And like all walkthroughs, use this one with care, explore yourself before you look for the answers described below.
The links within the walkthrough will take you a screenshot of that part of the game.
Tomahna | Haven | Spire | Serenia
TOMAHNA
Your first glimpses of Tomahna are through the windshield of a gondola driven by Yeesha, the daughter of Atrus and Catherine.
After stopping to take a picture, you land at the entrance to Atrus's workroom. Follow Yeesha through the door by pulling on the lever to the right of the entrance. On the left is a button that will call the gondola.
ATRUS'S WORKROOM
Inside the workroom walk forwards and Atrus will meet you. He asks for help in tuning the crystal viewer so that you can link with Spire and Haven, the prison ages of Sirrus and Achenar (to find out more about the two brothers you need to play Myst).
Zoom in on the screens at the left hand end of the work bench. Atrus explains the controls, all you need to do is match the waveforms in the right hand screen. To do this you need to combine the two waveforms in the left screen to match the one on the right. The slider switches between the waveforms and the three knobs control the amplitude, frequency and phase. Atrus will help you by telling you which control to use.
If you get really frustrated, zoom out twice and the game will continue.
When all is set up, Atrus activates the crystal viewer only to blow the power supply. Annoyed, he heads off to Rime to get a replacement, leaving you with the puzzle of turning the power back on, switching on the antenna and watching out for Yeesha. Before you head off, read his journal which is in the drawer to the right of the waveform adjusters. Take a picture of the crystal settings for Rime and note that you will have to tune the geodes using the antenna before you can use the viewer:

Might also be worth taking a good look around the workshop, you have much to do here later. In particular, note the lever at the top of the each set of stairs and the chair on the top level underneath the telescope. You can also play with the planetarium model on the desk as well if you wish.
POWER
Go to the stairs leading down. Pull the lever on the right at the top of the steps to open the door to the elevator. Jump in and the door closes behind you. Pull down the lever to the left of the door to the center position and when you stop, open the door with the lever on the right for you first proper view of Tomahna. Follow the walkway round to the right and into the greenhouse.
Climb down the ladder and you will see a lamp that swivels back and forth. It doesn't work - no power remember.
Up and out the other side. On your right is Catherine's workroom (if you visited the Myst Revelation website, this is where you began). Straight on is another Greenhouse. Yeesha asks you to take a look at a lizard she has found and tells you about her necklace. Her parent's don't believe her but then again do parents ever listen...
Out the other side of the greenhouse and down the steps. The left path leads to the master bedroom and some sort of landing platform . Explore if you wish, there are all sorts of interesting things so play with, however you can always come back later when you have restored power and spoken with Atrus.
Take the right hand path and you will end up at the hydroelectric power station. The rotor has stopped because the upper sluices are closed. Pull the lever to reset the circuit breakers and note the patterns on the two rectangular panels. Return to Catherine's workroom.
Yeesha tells you about her beetles and the control box. Go to the control box on the wall and open the cover. The LEDs tell you where there is power at the moment (columns 1 and 5). You need to transfer power from these columns to columns 3 and 4 (the symbols match those at the power station lever) in order to open the sluices and get things going again. The back row of keys tells you which column to transfer power from and the front row tells you which column to send it to. The button on the right activates the change and the lever on the left resets everything.
The first bit is easy. Press keys Back 1 then Front 3 and then activate using the button on the right. Now press Back 3 then Front 5 and activate. You should now have the green light glowing in column 3. To get the correct power setting on column 4 takes a bit more effort. Transfer power from 5 to 4, then 1 to 6 and finally from 4 to 6. Columns 3 and 4 now have a green light and the cover closes
Leave the workroom and return to the power station. When you get there the two panels should now be lit so press the big button on the top and away we go.
Head back to the greenhouses and... This is not good. An explosion, a green glow and you wake at night with a fuzzy head.
EXPLORATION
Climb up to the greenhouse and return to Atrus's workroom. You need to tell Atrus what has happened. And to do that you need to turn on and tune the antenna. Go up to the upper level in the workroom. There are 3 monitors watching over Tomahna and on the right is a power map. Lift up the power map and you will see a diagram linking the antenna to the telescope. Drop the chart and look to your right. At the top of the stairs is a little white light next to a lever. Zoom in and pull the lever.
Turn to your right again and go sit in the astronomer's chair. Press the red button and you will be lifted up. Zoom in on the telescope and play with the wheels to look at the moon - looks very familiar. Up on the right is the antenna button, give it a poke, zoom out and press the red button again. Jump out of the seat and go down to the smoking crystal viewer.
Zoom in on the viewer In the center below the screen are 5 covers each with a button and a single central button below. On the right is a lever with 6 coloured stops and above them is a slider that shows you 6 crystals shapes. You have to set the colours and shapes to match those you saw in Atrus's journal. When you have each one set, press the button below the cover and it will open to reveal the tuned crystal. When you have them all set, press the button in the middle and Atrus will appear. He can't get back yet and suggests that you read the journals in his bedroom. Since the walkway is destroyed you will have to find another way to get there.
Use the elevator to get to the lowest level. After a short trip across the water you will end up on a platform just down from the master bedroom. Behind the elevator is a lever that swings a bridge round from the other side of the lake. At the bottom of the stairs is a lever that calls the elevator. Go up the stairs to the next platform and into the Master Bedroom.
Atrus said that the journals were in the desk. Pressing the button doesn't work. Hmm. Open the little door at the top of the desk and read the note inside. Now press the button. The panels drop down and you can read the journals. Note the crystal settings for Spire and Haven:


Examine the letter on the right-hand bedside table, might be worth taking a picture (hint hint).
You are almost ready to leave but before you do, take time to look around the rest of Tomahna if you wish:
Use the crystal viewer in Atrus's workroom and to see images of Spire and Haven.
Use the lever to call the swing bridge, cross over and read the alphabet book on the verandah. Take a look round the kitchen and use the lever to swing the bridge round to get to Yeesha's bedroom. Under her pillow is her diary. Rude to read it I know but there is some important information about Serenia and how to unlock her bookcase. You can solve the puzzle now or leave it until later.
Read Catherine's journal in the desk drawer of her workroom.
Go down the ladder in the greenhouse and shine a light on the carved panel that might be worth noting.
When you have done exploring, return to the master bedroom
THE LINKING BOOKS
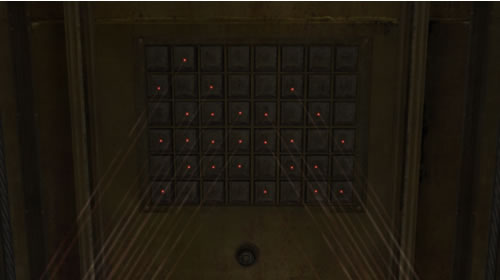
Flick the switches on the table and bedside lamps to turn them on. Duck into the fireplace and recall something similar from K'veer Island. Look down and you will see Yeesha's necklace. What has happened? This doesn't look good. Recall that she said the necklace showed her things, pick the necklace up and it will glow, click on the necklace and you will see a flashback.
Look at the pattern of dots formed by the lasers and press the button on the lintel. When the panel slides down you will see a bunch of buttons. All you need do is match the pattern. The key to this puzzle is noting what happens when you press a button: the 4 buttons on each side change colour. Knowing this it doesn't take long to match the pattern. When you got a match you will be taken down to the linking book chamber.
Stuck? Press the buttons in this order:

Leave the elevator and note that the security door isn't in place yet. Pull the lever in front of the golden sphere and it opens. Step inside, pull the lever on the right and you now have a choice of Spire or Haven. I decided on Haven first.
HAVEN
You arrive in a linking chamber that has been damaged by some sort of explosion. Zoom in on the crystal fragments on the floor, the necklace reveals that they were involved somehow in the explosion. Use the necklace on the bag in the corner to see Yeesha trying to escape. Up on the right is a horn that Atrus used to call Achenar. Exit the linking chamber. The main path is blocked but take the narrow passage up on the right. You are in a very windy place. There is a ladder going down to the left, a path to the right and a tunnel leading up. Go up the tunnel for a very pleasant view of the jungle. There is some sort of observation tower on the left, a path on the right and way off in the distance another tower with a flag on the roof.
Back down and then down the ladder (you really do not want to investigate the path yet!).
THE SHIP
Follow the path at the bottom of the ladder. As you head towards the ship, look to the right at the skeleton. Use the necklace to hear Achenar's fight with the creature. Take note of the symbol on the totem pole.
Go to the little building in front of the ship. There is a wheel, lever and handle inside. On the floor is a box that you can slide towards the cannon balls. Exit the hut and go down the steps on the right. There are some more cannon balls. Roll some of them into the crate and use the wheel in the hut to raise the crate. Pull the lever and the hut rises up. The walkway to the ship has a bit missing but if you follow the ropes you will see that they end up at a square panel in the floor. You need to put some weight on the panel to raise the walkway. Slide the little handle to the right and you will drop back down. After some experimenting you will discover that you need to put three cannonballs in the outer crate and two cannonballs in the box. Slide the box back into the hut, wind the wheel and bull the lever. Slide the box onto the square panel and you should get a path to the ship. Walk across and to the middle level.
Up the ladder you come face to face with a Karnak. Shoo it away and walk forwards to the end. On your right is a mechanism. Turn the handle and the sail unfurls. It seems to be a map of the jungle. Zoom in and take a picture, you will find it very useful later:

Zoom out and flick the little lever across. There is a small opening on your right, duck inside and on the bed is Achenar's Journal. Inside you will find sketches of five creatures: Camoudile, Zeftyr, Mangree, Karnak and a Sea Monster.
Leave the bedroom and climb down the ladder. Climb down the rigging to the lower level. On the desk is a sketch of various footprints. Climb back up and leave the ship. Flick the little lever in the hut and down you go.
Follow the path back to the ladder. Take the path and round the corner is Achenar's tent. Take a look inside. What the... A very surprised Zeftyr knocks you out of the way and a gust of wind carries you and the tent down the forest floor.
EXPLORATION
Very woozy you wake up with a Mangree jabbering away in your face. It yells a warning and runs away as a Camoudile slinks off into the undergrowth. Look down and note the shape of the Camoudile footprints. You are standing at a T-junction with paths leading left (with the remains of the tent), straight on (with the footprints) and right.
Take the right hand path and follow it to a gap in the rocks, You can see two Zeftyrs grazing. On your right is another path. Move towards the Zeftyrs and they take off. As you go forwards they come under attack by a Camoudile. When the way is clear, keep going to the end of the path. Turn round and there are some odd looking plants. The Camoudile would like you for lunch put the plant releases its spores and the Camoudile passes out. You don't feel much better but at least you can keep going. Go back the way you came (1 click) and you will see another path on the right. Take this path and go to the right of the boulder. Zoom in on the totem and note the symbol. If you recall the map, you will be able to work out that this is the Camoudile totem.
Back the way you came and go through the gap in the rocks. Turn to the left and follow the path up the hill. You will see two Mangrees escaping from a Camoudile - note the warning cry they make.
A little further on is another junction. Take the path with the wooden wreckage and follow the path to the swamp. This seems to be the province of the Zeftyrs. At the next junction go left to the Zeftyr totem. Note the symbol on the totem and go back to the junction. Take the left path and you will end up overlooking a lagoon.
Climb on the structure and into the little hut. Pull the lever hanging from the roof and the cover of a mechanism opens. There are 5 handles you can pull up, four of which display images from the totems (the fifth is broken). You will recognize three of the images: the Sea Monster, Camoudile and Zeftyr.
Two more to find then. Leave the lake and follow the path back to the junction with the wooden wreckage. Take the path to the right (under the fallen tree). Two clicks and you will see a locked gate on the right. Go straight on and on the left you will see an injured Mangree. His mate is very agitated. Touch the injured Mangree and his mate throws fruit at you. Slide the fruit towards the injured Mangree - it may help. Keep going down the path until you can see the cliffs in front of you. There is a path off to the right that will bring you back to the tent. If you had gone straight on you would have ended back at the cliffs).
At the tent junction, take the path with the Camoudile footprints. A Mangree crosses your path, calls out the same warning you have already heard. The path seems to be a dead end but turn about and you will see the observation tower. Move the ferns out of the way (left and right). Straight on and up the ladder to the observation tower. Hanging above the entrance is a diagram of the food chain:

top to bottom it reads: Sea Monster, Camoudile, Mangree, Karnak, Zeftyr.
At the other end of the tower are three wheels. Zoom in. If you turn them you will hear a low, middle and high note. In the distance three Mangrees a clambering all over a totem and covering up the symbol.
If you can replicate the warning sound you should be able to scare them away. The sequence to scare them away is: 1 turn on the right wheel, 1/4 turn on the left wheel and 1 turn on the right wheel. Turn the wheels as a comforatable speed - too fast or too slow and the Mangrees will not run off. This does take some practice but when you get it right remember how fast you turned the wheels as you have got to do it a lot more later!
Also, I found that one whole turn was about right, other walkthroughs suggest that 3/4s is enough - it doesn't matter too much. And when you make the 1/4 turn, don't worry if you don't hear anything, it will still work.
With the Mangrees scared away, zoom in and note the Mangree symbol.
Leave the observation tower and return to the tent junction. Turn right, go past the tent then left at the junction and you will see that the injured Mangree ate the fruit and has gone. Carry on down the path to the locked gate (on the right). Zoom in on the panel next to the gate. Listen with the necklace and lift up the cover to reveal the lock mechanism. The puzzle here is to get the little hammers onto the white squares but outside the three sliders.
There are loads of solutions but here is mine:
Top hammer down - Middle slider left - Top hammer up - Top slider right 1 - Bottom hammer up - Middle slider right - Bottom hammer down - Bottom slider left 1 - Top hammer down - Middle slider left 2 - Top hammer up - Top slider right - Top hammer down - Middle slider left - Top hammer up - Top latch slides open.
Bottom hammer up - Middle slider right 2 - Bottom hammer down - Bottom slider left - Bottom hammer up - Middle slider right - Bottom hammer down.
The gate opens and on you go. At the end of the path you are overlooking the lagoon. On the right a couple of Karnaks are fishing. Behind you is the last totem. Zoom in and note the Karnack symbol.
THE SOUTHERN FOREST
Back the way you came, through the gate and go straight on until you reach the wreckage. Through the swamp to the lagoon. Up onto the platform and the bridge controls. With all the totem symbols noted it is a moments work to set the controls. Pull the lever again and lift up the shafts so that the symbols match the order of the food chain: Sea Monster, Camoudile, Mangree, Karnak, Zeftyr
Since the fourth control is broken, you will have to use either the third or fifth shaft to work out how high it should be.:

With the 5 shafts set, pull down the paddle on the left of the controls and the bridge will fall. Off to the tower we go. Open the broken door and go inside. On the bed is another journal. Achenar notes that the Mangrees have names. On the desk is a rolled up drawing of a Mangree and his name. There is another drawing in the trunk behind you. Climb the ladder to the upper level. Note the third Mangree name on the desk and lift up the drawing on the easel to see the fourth Mangree name. climb down and look inside the truck near the door. Seems like Achenar is a bit of a diver
Leave the hut and carry on along the path. You will come to a ladder and a hungry Camoudile. Hmm, need to get rid of him somehow. Carry on along the path and climb the ladder to the tower. The Camoudile approaches and chases two Mangrees into their nests. If you can call their names, the Mangrees will move into an empty nest using the ropes. They will not move however if the Camoudile is under their tree and when they do move, the Camoudile will run to the new location.
Note three very familiar wheels above you, the pit in the middle of the clearing and the stun plant next to it. Turn round and note the drawing of the call for a Mangree to throw things and the map of the Mangree nests.
Lets see what we can do here. Save your game, number the nests 1 to 5 from left to right and use the wheels to call each Magnee names.
The trick again is to not turn the wheels to quickly. A long call is about 1 full turn and a short call is about 1/4 of a turn.
There current nests, descriptions and names of the Mangrees are:
1: One Ear (short left, long right).
2: Rabbit Ears (long right, short middle).
3: Flat Head (short middle, short left).
4: Whitey (long left, long middle).
Reload your saved game and move Rabbit Ears from nest 2 to nest 5 (long right, short middle). Now move One Ear from 1 to 2 (short left, long right). The Camoudile falls into the pit but escapes before the stun plant can knock him out. In his journal, Achenar noted that the Mangrees favourite game was throwing fruit. The nest on the left has a supply of fruit so if you can get a Mangree into nest 1 and throw some fruit at the plant to get it to release its spoor before he gets out all should be OK. You will soon discover however that Mangrees are rubbish at throwing things. Except for old Whitey who can hit the plant every time.
Ready to go? Reload your saved game again and this is the winning sequence:
Rabbit Ears from nest 2 to nest 5 (long right, short middle).
One Ear from nest 1 to nest 2 (short left, long right). The Camoudile falls in the pit.
Rabbit Ears from nest 2 to nest 5 (long right, short middle).
Whitey from nest 4 to nest 5 (long left, long middle).
Flat head from nest 3 to nest 4 (short middle, short left).
One Ear from nest 2 to nest 3 (short left, long right).
Rabbit Ears from nest 1 to nest 2 (long right, short middle).
Whitey from nest 5 to nest 1 (long left, long middle).
Save your game now! Two more moves and you can get old Whitey to chuck an apple at the plant.
Rabbit Ears from nest 2 to nest 5 (long right, short middle).
One Ear from nest 3 to nest 2 (short left, long right).
As soon as One Ear begins to move, get Whitey to throw the fruit. The call is: long right, short left, short middle. The fruit sails through the air the Camoudile is knocked unconscious and the Mangrees are most grateful.
Climb down from the tree house, go back to the ladder and climb down to the clearing. Follow the Mangree along the path and climb up into the next tree house. Note the drawing on the leaves. Follow the walkway made out of leaves and sit down in the chair. The lever has a snake like thing wrapped around it but use the necklace to see how Achenar gets it to the clear orf.
This can be a bit awkward so here are some hints:
Use your fingertips on the bottom stripe on the right, stroking from right to left. Note that the hand icon should not be a pointy finger or grabbing hand.
Hold down your left mouse button for each stroke and release at the end
Do not stoke too slowly.
When the dragon wakes, click on its head as quickly as possible since it really didn't want to be woken up.
Once the dragon has gone, touch the control bar and a Mangree accompanies you for an aerial tour of the forest. Guess where you end up? And since there is no sign of Achenar, we must assume that he has escaped. Into the linking chamber, open the pedestal and link back to Tomahna.
When you arrive you will see somebody on the other side of the lake link out and drop the linking book. You can follow them if you wish. I decided however to go straight to Spire
SPIRE
On arrival you will be in the remains of a linking chamber. Much like the one on Haven there is much damage. Leave the chamber and climb down the stairs. A little way down on the left is a broken elevator. Keep going down until you reach the first level.
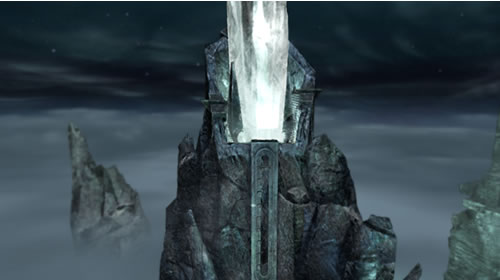
The bridge to the right leads to an elevator that we will use later. Take a close look at the sculpture in front of you. It is the one you saw in the crystal viewer. Down to the right of the sculpture is the remains of a fire (with a flashback) and a chilly looking bed.
EXPLORATION
Go to your left and round the corner and at the end of the path is a crystal in a pentagonal housing. Note the setting on the scale (4). Down to your right is a hole. Want to see where it goes? Jump down and after a bumpy ride you end up at the Docking Station. Go forwards and look left. There are 7 suspended conductors and way off in the distance is another structure. Off to the right is a ladder and a circuit board that you can examine if you pull up the lever. Note the arrangements of crystals: 4, 7 and 29.
Follow the green cable to the left to a coffin shaped thing. On the cover of the coffin shaped thing is an image of the electromagnet that is down to your left. Press the blue button on the left and the cover opens to reveal a control console. Flip down the switch on the left and experiment if you like but you will be coming back when you have found out what it is for.
Climb the ladder and open the hatch by pulling the lever to the left. Through the hatch is the Garden Level with another ladder going up. Go right towards the floating rock and the workbench. Read Sirrus's journal and play with the models. The little wheel powers up the crystals as Sirrus describes in his journal. Slide the control to the left and wind the wheel to see the crystal rise up. Look through the telescope to see the other palace that Sirrus spoke about.
Leave the bench and turn to face the ladder. Off to your right is a path to an elevator. Walk past the ladder and keep going to (for what of a better description is) Sirrus's living quarters. On the right is a workbench. To the right of the workbench is a hollow green crystal. Examine and jump inside. You will arrive in a crumpled heap in the power chamber. There is a statue, exit door, three cables, a power switch and most importantly: the throne. Examine the statue and note the last three lines of the diagram. Sit in the throne and press the blue button. When the control panel lowers note the 3 strings and the control lever on the left. Etched in the panel are the numbers 4, 11 and 36. Nothing works yet but at least you know what you need to do: get some juice flowing.
Press the blue button to raise the control panel and open the exit door using the lever. Up the stairs and into the elevator. Pull the handle up and rise majestically up to the Garden Level. If you pull the lever again you will end up at the upper level.
Return to Sirrus's quarters and examine the big crystal at the far end. Note the hexagonal housing. Turn about and examine the scale embedded in the louvers. Note the setting on the scale (7).
Go to the workbench and read the notes:
Nara needs full power on all settings.
Rock has a maximum setting of 20.
In the compartment on the right of the bench:
Blue crystal needs the settings from the docking station and garden.
Rock needs two harmonics from the musical scale.
Go to the bed and down by the water container is another note:
Blue crystal has a first setting of 3.
Head back towards the ladder and on the floor next to a cubic stone is a note:
Crystal has a setting of 6, 12 and 4.
Go back to the ladder and climb up.
SHIP AHOY
At the top of the ladder is another control console with 4 conductors in front of you. To the left is a floating pod and above you is another electromagnet. Press the blue button to open the console and flip down the switch on the left. The indicator on the right tells you where the pod is and the mark tells you where is should be. Your job is to balance the power between this console and one down on the Docking Level so that the pod ends up at the white mark on the scale. Since this means that the pod needs to float down 5 levels, we need to add 2 units of power to this console and 7 to the one on the Docking Station.
With a little experimentation you will work out that the slider has 3 positions and you have 3 adjustments before power is transferred from the 4 floating conductors above you. The three slider positions make the following changes: left +1, center + 2, right -1. Reset the console by opening and closing the switch on the left and move the slider: left, center, right. Power is transferred from two of the floating conductors to the electromagnet (as indicated by the crystals on the console). After a moment the pod will rise up and glue itself to the upper electromagnet.
Close the lid on the console and climb down the ladder, through the hatch and down to the Docking Station. Go to the power console, press the blue button to open the lid and flip down the switch. The slider has 3 positions and you have 5 adjustments before power is transferred from the 7 floating conductors in front of you. The three slider positions make the following changes: left +1, center -2, right + 4. Reset the console by opening and closing the switch on the left and move the slider: right, center, right, center, right. Power is transferred from the 7 floating conductors to the electromagnet (as indicated by the crystals on the console). This will give you a difference of 5 between the upper and lower electromagnets and the pod should now float down gently and the gangway extend.
Before you go for a ride, check the circuit board and you will see all sorts of things lit up.
THE FARAWAY PALACE
Climb into the pod and push the handle fully forwards. When you dock at the other palace, climb out and walk down the path. There is another control console but the gap to reach it is too big to jump. Go to your right and climb down the rope ladder.
Seems a little warmer here, which is nice. Off to the side is a telescope. Zoom in and use the 4 buttons to aim the thing. When there is something of interest the blue button will glow. Press the blue to zoom in. At the bottom of the palace you will see a mechanism connected to something way above. Off to the left is a crystal in a round housing. Note the setting on the scale (3). The necklace shows a very upset Sirrus.
Turn about and go to the windlass. The lever is jammed but note the lump of Nara on the right between two of the spokes. Push it out of the way and it will float away Pull the lever and the massive Nara crystal will rattle up. Climb the rope ladder and there is now a path is to the control console.
The symbol on the cover shows 3 strings. On the throne control panel, the number 36 was engraved next to the lowest icon. Your task is to get power from a total of 36 conductors transferred to the throne.
Open the cover using the blue button. The slider has 4 positions and you have 5 adjustments before power is transferred from the 34 conductors in front of you. The four slider positions make the following changes: +7, -3, +10, +2. Since you already have a total of 9 units of power from the other two consoles, you need another 27 to achieve full power. Easier said than done. There seems to be no combination of moves that will give you 27 but if you can get all 34 lit then you only need to shut down the docking level console to get 36 (34 here plus 2 on the upper console). Reset the console by opening and closing the switch on the left and move the slider: right, right, left, right, left.
Power is transferred from the 34 conductors (as indicated by the crystals on the console). If you follow the cable it leads to another circuit panel. You will see that everything is connected except for one little connection at the bottom of the left hand panel.
Note that there are a whole range of other solutions that will give you 36: 26 + 6 + 4, 26 + 7 + 1, 29 + 7 or 29 + 6 + 1 will all do the same job.
Return to the main palace using the pod and shut down the lower console by opening the switch on the left. Check you have 36 crystals lit on the circuit board and climb the ladder to the Garden Level. Down the chute or the elevator and sit down in the throne.
Pull down the lever on the left. The first stop is the crystal chamber. At the bottom, the crystal racks drop down and on the console three little sliders appear. Through the middle of the control panel you can see 4 crystals/rocks in circular housings. Off in the distance is the Bomb Factory.
TUNING SPIRE
Your task is to tune the crystals. But before that you need to tune the whole palace. Click on the square panel at the bottom of the console. Now press the button that is revealed and you will drop down even lower.
Hanging by a thread above the abyss, examine the three mechanisms. Each one is associated with one of the big crystals. You need to tension the cables using the settings from the three crystal housings: pentagon: 4, circle: 3, hexagon: 7. Note that each of the setting markers was at already at position 1 which means you need to move the mechanisms as follows:
Pentagon: 3 clicks
Circle: 2 clicks
Hexagon: 6 clicks
When all three are set, press the big button up on the left and rise once more to the crystal chamber.
Note that if you go all the way back up to the upper level you can see that the pentagonal crystal is now set.
Your next task is to tune the 4 crystals using the information from Sirrus's notes. The settings for each are:
Crystal: 6, 12, 4
Blue Crystal: 3, 1, 7
Rock: 10, 5, 5
Nara: 12, 12, 12
If you set each one in turn and zoom in on the vibrating crystal you will see a number of holes in each housing. The higher the number of holes, the faster the crystal will stop vibrating. The duration of each vibration is:
Crystal: 60 seconds
Blue Crystal: 30 seconds
Rock: 20 seconds
Nara: 15 seconds.
Since this is a timed puzzle, give yourself as much help as possible. You need to tune the crystals from slowest to fastest and crystals will not begin to vibrate until the last string is set. There is then a slight pause while the crystal gets up to speed and then you can move to the next one. The actual sliders can be a bit tricky to position but if you 'right-click' to fix the screen and counting the lights as they go out it helps a lot. I found I had plenty of time to do the puzzle but before you begin, save your game.
Take a deep breath and here we go:
Move the left slider up to 6, middle to 12 and right to 4. Pause until the crystal is vibrating.
Move left down to 3, middle to 0 then up to 1 and right up to 7. Pause until the blue crystal is vibrating.
Move left to 12 and back 2 to 10, middle up to 5 and right down to 5 (they will be level). Pause until the rock is vibrating.
Move all three to 12.
When the crystals are all vibrating together a pathway appears in front of you. Press the blue button to raise the control console and walk forwards to the Bomb Factory. On the left is an elevator with a huge chunk of linking chamber wall jammed in the mechanism. On the right is a crystal toy and a lever that if you slide it to the right will allow you to power up the crystals racks.
Round the back are two containment canisters with the settings for rock and nara. Remember the shattered crystal in the Haven linking chamber and the explosion on Tomahna? What's the betting that you could use a charged crystal to blow the chamber wall away. Slide the collecting pot to the left. This will allow the crystal to fall to the floor and since it will no longer be contained, it will explode. Head back to the chair, lower the console and shove the three sliders up to the top.
A crystal is released. It races along a tube and there is a satisfying explosion. Very green I noted - recollection of an explosion on Tomahna? Head back to the elevator and the mechanism is now free. Look down and you will see a medallion hanging on the mechanism. Click on the central lever and note the combination of colours. This was my set, but it is different for every game:

Take time to read Sirrus's journal, there are some important clues you will need later on.
All done here so take the elevator up, climb the stairs and return to Tomahna. Note that since there was no sign of Sirrus, we must assume that he has escaped from Spire.
TOMAHNA
With our explorations of Haven and Spire complete, it is time to find out who was in Yeesha's bedroom.
Pull the lever on the right to open the door. Go to the elevator, press the button to call the lift and return to the Master Bedroom. Outside and down the steps to the lower platform. Behind the elevator on the balustrade is a lever that swings a bridge across. Cross over and examine the book on the verandah table. Take a picture, it may be useful:

In the kitchen, note the pictures of the Achenar, Sirrus and Yeesha.
Back outside and pull the lever to swing the bridge down to Yeesha's bedroom. Somebody has been looking for something. Read her journal (under her pillow). She writes about the new code for her bookcase - you need to find everybody's birthday. The book outside the kitchen translated the D'ni alphabet and the letter on the bedside table gave you spelling for Atrus and Catherine. All you need now is Sirrus, Achenar and Yeesha. One simple method is to go to the lower greenhouse level and look at the carving on the wall. The other is to do it yourself.
Whichever method you use, the result is the same. Number the books 1 to 16 from the top left to bottom right and press: 12, 6 8, 3 and 14. The bookcase slides away and you can climb down to the lower level. There on the water's edge is the Linking Book. Open the book, click on the image and off you jolly well go.
SERENIA
 After
you arrive, turn about and zoom in on the pedestal. The Linking Book is
on the floor and the necklace explains why.
After
you arrive, turn about and zoom in on the pedestal. The Linking Book is
on the floor and the necklace explains why.
If you decide to use the linking book you will arrive at a familiar location in Tomahna (if you have played Exile). Explore a bit, you should find some background information and a way to unlock the door in Catherine's workroom.
Turn about and walk forwards over the bridge. Play with the bubbles to pass the time and head down the path. Just before the wooden bridge there is a path off to the left leading to a waterwheel. If you move the lever either way, the water flow is cut off.
Leave the water wheel and cross over the wooden bridge to the four-way junction. You see Achenar running away. Leave him for now, you will never catch him.
EXPLORATION
Note that during your exploration of Serenia you will see the wind, water and fire spirits that Yeesha wrote about in her diary. Make note of the places you see them - they do move around.
From the four-way junction head off down the left hand path. You will come to a platform on the left with a little trolley and some levers. You can use it to shut off the water flow to the streams. Play if you like but you don't need to worry just yet. Go round the corner and take the bridge off to the right. The path leads to two streams which cross. The right hand path takes you back to the four-way junction. Go straight on over the stream and take the path to the right. On the right is another waterwheel. The amulet shows you Sirrus sabotaging the left hand mechanism.
Follow the path round past the pool and go left. At the end of this path is a closed drawbridge. Bet there is a lever on the other side that opens it. Turn about and walk back taking the path on the left which brings you back to the four-way junction.
Turn right and follow the path down to the cross streams. Go right over the bridge. Go straight on or take the left fork, either one brings you to the same place. A bit further on down the path is a junction on the left that goes over the stream and back to the trolley watergate. Continue down the path and down the stairs to the archway where you will be met by Anya, one of the Protectors.
She suggests that you follow the path to the memory chamber. Go straight ahead, over the junction and through the arch. Down the stairs and turn left. Go down the steep steps and you will see something rise from the depths. Sirrus (for it is he) lifts something out, sees you, opens the hatch and destroys the submarine thing. Follow the path round to the back of the pool and you will see more of the destruction he has wrought. Turn about and duck into the memory chamber on your left. Place your hand on each of the 4 statues and you will see that Yeesha is held captive somewhere in Serenia, Achenar is stealing something and Sirrus looking very smug.
Leave the memory chamber and go back to the steep steps. You will be met by another of the Protectors who tells you that the thing is a harvester used to collect memory globes. Follow her round to the back of the harvester and she tells you that she may be able to salvage the machine using parts from another harvester.
Back to the top of the steep stairs and turn left. Follow the path, go over the bridge and down to a circular platform where you can see the old Memory Chamber and a glimpse of what seems to be another harvester behind it. Climb the steps round to the right and you will see Achenar climb out of a gully with the life stone you saw him stealing when you were in the Memory Chamber. He tells you that Sirrus is holding Yeesha captive and suggests that you find his journal - it is in a pillar near where the two streams cross.
Lets go and find it. Return to the cross streams, the zip option is ideal for this. Turn so that the upper stream is behind you and the lower stream on your left. Go forwards once and zoom in on the rock on your left. Open the box and inside is Achenar's journal. Makes an interesting read. Note the tunnel below the old Memory Chamber.
THE OLD MEMORY CHAMBER
Go back to the 4-way junction. Take the path that leads over two wooden bridges. Keep going all the way down to the drawbridge which is now open. Go through the rock and down the steps to the old Memory Chamber. The door is locked (surprise, surprise) but round the back is a pool fed by two streams. Between the two bridges are two levers. Push the left one and the old harvester rises from the depths. Climb on board and close the hatch. Face the porthole and pull down the bar just above. As you submerge, note the underwater door and memory globes at the bottom. Pull the bar to rise back up and exit the harvester. Face the harvester and if you look to the right of the gangway you can see some sort of steps leading down to a closed door. If you can get rid of the water maybe you can find out what's down there...
Leave the old Memory Chamber and climb the steps. Turn right at the top and follow the path down into the gully that Achenar climbed out of. From the gully you can get into the root chamber. There is a reflector that swivels about and behind it three pedestals. One is empty - guess what used to be there? Climb up the ladder and pull the red lever. Up and out into the sunshine.
Up the steps to where you met Achenar and turn right onto the wooden path. At the end is a wooden wheel around which is wrapped another dragon. Since you now know how to wake him, do so now. Turn the wheel and water will fill the pool on your right and, more importantly, stop on the left. Since this was one of the streams that fed the harvester pool, half your problems are over.
Go down to the stairs and head for the promontory facing the island where a Protector will speak to you. She suggests that you go to the Hall of Spirits (which you can) but I want to investigate the old Memory Chamber first. Head back over the wooden bridge and go to the very first water wheel you saw after you arrived in Serenia. Push the lever all the way to the right and the water flow to the left will stop. As you walk back along the path you will see that the stream is dry.
Go to the four-way junction and take the left path to the trolley watergate. Climb up and move the T-bar to the right to engage the drive mechanism. Go round to the front of the trolley and push the lever over to the right. Disengage the trolley from the drive, climb down and go to the corner of the path. Turn left and pull down on the toggle. The mechanism will operate and shut off the flow of water to the stream on the left. Walk back to the cross streams and note that the lower stream is now dry. Head back to the old Memory Chamber.
Round the corner to the harvester and you will see that the water in the pool is calm. The problem now is how to get rid of the remaining water. Begin with Archimedes principle. Pull the right lever to close the hatch and the left lever to lower the Harvester. Raise the harvester and you will see the door in the wall open. Climb down the steps to the right of the gangway. In the tunnel note the door at the end and the connecting gears. Below the window in the wall is a wheel. Turn it. A hatchway opens and more water drains away. Still not enough to open the lower door. Climb back up and lower the harvester again, this will cause water to overflow through the hatchway. Now open the hatch of the harvester, wait for it to fill with water, close the hatch and raise the harvester.
This last action should lower the water level enough to open the door in the tunnel. On the other side of the door is a sealed airlock. Press the button and you will be confronted with 18 coloured disks. In his journal, Achenar wrote about the door and one of Sirrus's 'infamous marble color codes'. On Spire you should have noted the combination of colours on the amulet but this is not enough to solve the puzzle.
DREAM
Leave the old Memory Chamber and go to the archway where you first met Anya. Facing the lake, go forwards to the junction and climb the stairs on the left. This is the Hall of Spirits. On the floor is a cloth. The Protectors are still in Dream but wait a while and Zaneeka will awake. She advises that you need to discover your spirit guide. When the blob spreads out on the cloth touch it and will see one of three clues as to your spirit guide: pollen, bubbles or fire. The appropriate Protector will offer you the cloth and then they are gone. To see the cloth, use your viewer.
Time to find your spirit guide. Depending on whether you have pollen for wind, bubbles for water or fire for fire, you need to first find your spirit. Whatever you do, do not get to close, you will scare them away. Once you know where they are, you need to find the appropriate offering. The bubbles and pollen are relatively easy to catch. Fire is a bit more difficult. Find the bell flowers and hold your hand beneath the bloom just as it drips the flammable nectar.
You now have about 15 seconds to get to your spirit before offering dissipates. You also need to be very gentle as fast moves will blow them away. You may also find that some spirits are easier to get to than others. You can move the spirits to more favorable locations by getting close by without an offering.
This is how I did wind. It was round the back just beyond the trolley Watergate The spirit shifted round to the junction leading to the drawbridge, I could see the spirit from the path with the double bridge so I doubled back to the path leading to the protectors. With some pollen on my finger tips I went back up the path, turned left path the sabotaged water gate and down to the wind spirit. Left click on the spirit and away we go.
This is how I did water. The spirit was in the pool next to the first waterwheel. I could see the spirit from the path so I walked towards the arrival cave and collected a bubble. With a bubble on my fingertips I went back down the path to the water spirit. Left click on the spirit and away we go.
Ready for Dream? Return to the memory chamber and climb the stairs on the left of the central core. You will be met by Zaneeka who asks you to lay down. Listen to her and before you know it you will be on your way.
Say Hi to your spirit guide. Play with the sparks and then off again to see the ancestors. Yeesha is the bright white light. All you need to do is get all of the ancestors to go white as well. Ha! Save your game, as you may be here a while.
The trick is to keep moving in squares. From Yeesha, go right, down, left and back to Yeesha. Keep doing this until the light nearest Yeesha is white as well. Go right and right again, then down, left and up and repeat until there is another white light next to the others.
You will soon learn the colour sequence: red, purple, blue, cyan, green, yellow, white.
It is not that difficult, just time consuming. And the lights keep shifting round as well. You will end up going over the same lights more than once as you chase down the colours, just be patient and it will get sorted eventually. If you make too many mistakes, the ancestors will get annoyed and change back to their original colours.
If it all becomes just too frustrating, here is a saved game. It will apear in your saved game list as: Cloud Complete.
When you have got everything white your spirit guide will return you to the memory chamber. Get up and leave the memory chamber and you will be met once more by Anya who shuts you out of the Memory Chamber.
OPENING THE DOOR
Use the zip mode to return to the old Memory Chamber. Go to the door and a very surprised Sirrus emerges. Listen to his request. Do you trust him?
Round the corner and down the steps to the airlock. Click on the button below the hatch. 6 segments slide out the way and you are confronted with 18 coloured lights.
Use the necklace to see Sirrus's amulet and the coloured light's you saw in Dream:

If you haven't already got the 6 colours from the amulet on Spire you need to go there now. Note that the colours are different for every game so don't try to use mine unless you have downloaded my cloud solution!
You first task is to replicate the 6 colours from the amulet in the 6 inner locations on the door. If you click on a coloured disk you will see the options as to where you can move it. Shuffle the colours around until you have the 6 colours from the amulet in the inner 6 locations.
Now add two coloured disks to each of the inner disks so that you replicate one of the triplets in the image above. This will give you 6 sets of three discs each with either red, green and blue or yellow, purple and cyan. For example, I had a green disc at the top of the amulet so I needed a blue and red disc to make up the triplet.
If you have downloaded my saved game with the clouds complete, this is the solution to the door puzzle:


Start - Inner Ring Complete - Final Solution
Note that the inner discs match my amulet.
When you think you have is set correctly, press the button below the door again and it will open.
Walk forwards and climb the ladder into the old Memory Chamber. Note the heart flower sealed away and a life support capsule with a very still Sirrus inside. Up the stairs to the upper chamber and there is Yeesha just as you saw her in the Memory Chamber. She begs that you let here go so go round to the back of the control console. But before you can pull the lever, Achenar appears and offers a different version of events.
Only you can decide. Silver or yellow lever? Save your game and make a decision.
RELEASING YEESHA
When you have got it right, wait for the sequence to play itself out and sit down in the chair. Look up and the eyes have it. This time you discover that an interloper is preventing Yeesha from returning to the real world.
When you get to the next puzzle you are presented with 5 images each with one or more icons floating above them. If you hover over each of the icons you will hear part of a conversation between Yeesha and Sirrus. Your task is to rebuild the conversation and place the sentences on the relevant image.
You will discover that you can pick up all the icons from a figure and drop them off one by one on adjoining images with the top icon going to the bottom of the new image.
The conversation is:
Yeesha: Daddy's really good at chess.
Yeesha: You should play him.
Sirrus: I'd like to sis, but I don't have a chess set.
Yeesha: You can make one just like you made my spirit guide.
Sirrus: I could, but it's really hard to carve figurines that small.
Sirrus: They break so easily.
Yeesha: Well, maybe mum and dad could give you a set, as a present
Yeesha: I'll tell them to when I link home.
Sirrus: Ha, right, and I suppose you'll tell them to make it out of the same rock as this chamber.
Sirrus: That way, I'll never be able to break it.
The image sequence is: chessboard, figure, picture, linking book, chamber door.
My sequence of moves is as follows (the first location is where you pick up the icons, the succeeding locations are where you drop them off):
Chessboard - Door - Book - Picture
Book - Door - Book - Picture - Figure
Door - Book - Door - Chessboard
Chessboard - Figure
Door - Book
Book - Door - Book - Door
Door - Chessboard - Door
Chessboard - Figure
Book - Picture
Picture - Book - Picture - Figure - Picture - Figure
Picture - Book - Door
Book - Picture - Book
Door - Book - Door
Door - Chessboard
Book - Door - Book
Chessboard - Door
Figure - Chessboard - Figure - Chessboard - Figure - Chessboard - Figure
There are no doubt others but this one took me long enough to find!
As each image is set a white glow will appear around the image:


When all is set, the conversation will replay and you return to the interloper. Although it's hold over Yeesha is weakened you need to do more.
The next puzzle is similar to the last only this time there are only four images and Sirrus is the only speaker. His monologue is:
See this globe little sister
See how round and smooth and empty it is
When I turn the switch, the chair you are sitting in will activate
Lights will go on
And everything that is you will be sucked out of your body
Leaving behind the perfect disguise for me to step into
Father and mother will teach you the art
Never knowing that it's me who is doing the learning
Of course, I'll kill them as soon as I know how to write Ages
Then, I'll put my new memories back on my body and no one will be able to stop me
The image sequence is: globe, chair, book, coffin.
My sequence of moves is:
Chair - Globe - Chair - Book
Globe - Coffin - Globe - Coffin
Globe - Chair
Coffin - Globe - Chair -Globe - Coffin -Book - Chair
Globe - Coffin - Globe
Coffin - Globe - Coffin
Globe - Coffin - Globe
Coffin - Globe - Coffin
As each image is set a white glow will appear around the image:


If you have everything set, Sirrus will speak his words and you return to Dream.
And all you have to do now is sit back and watch the game play itself out to the end.
THE END
Obduction Scratches MystMyst II: Riven Myst III: Exile Myst IV: Revelation Myst V: End of Ages Uru - Ages Beyond Myst Uru - To D'ni Uru - Path of the Shell Dark Fall - The Journal Dark Fall - Light's Out Rhem Rhem 2 - The Cave Rhem 3 - The Secret Library Reah Schizm Riddle of the Sphinx The Omega Stone Amerzone Zork - Nemesis Zork Grand Inquisitor Hype - Time Quest
If you have found this walkthrough useful, discovered an error or have a suggestion then let me know: feedback.
![]()
