Welcome to the Rhem3 Walkthrough
Rhem | Rhem 2 - The Cave | Rhem 3 Map
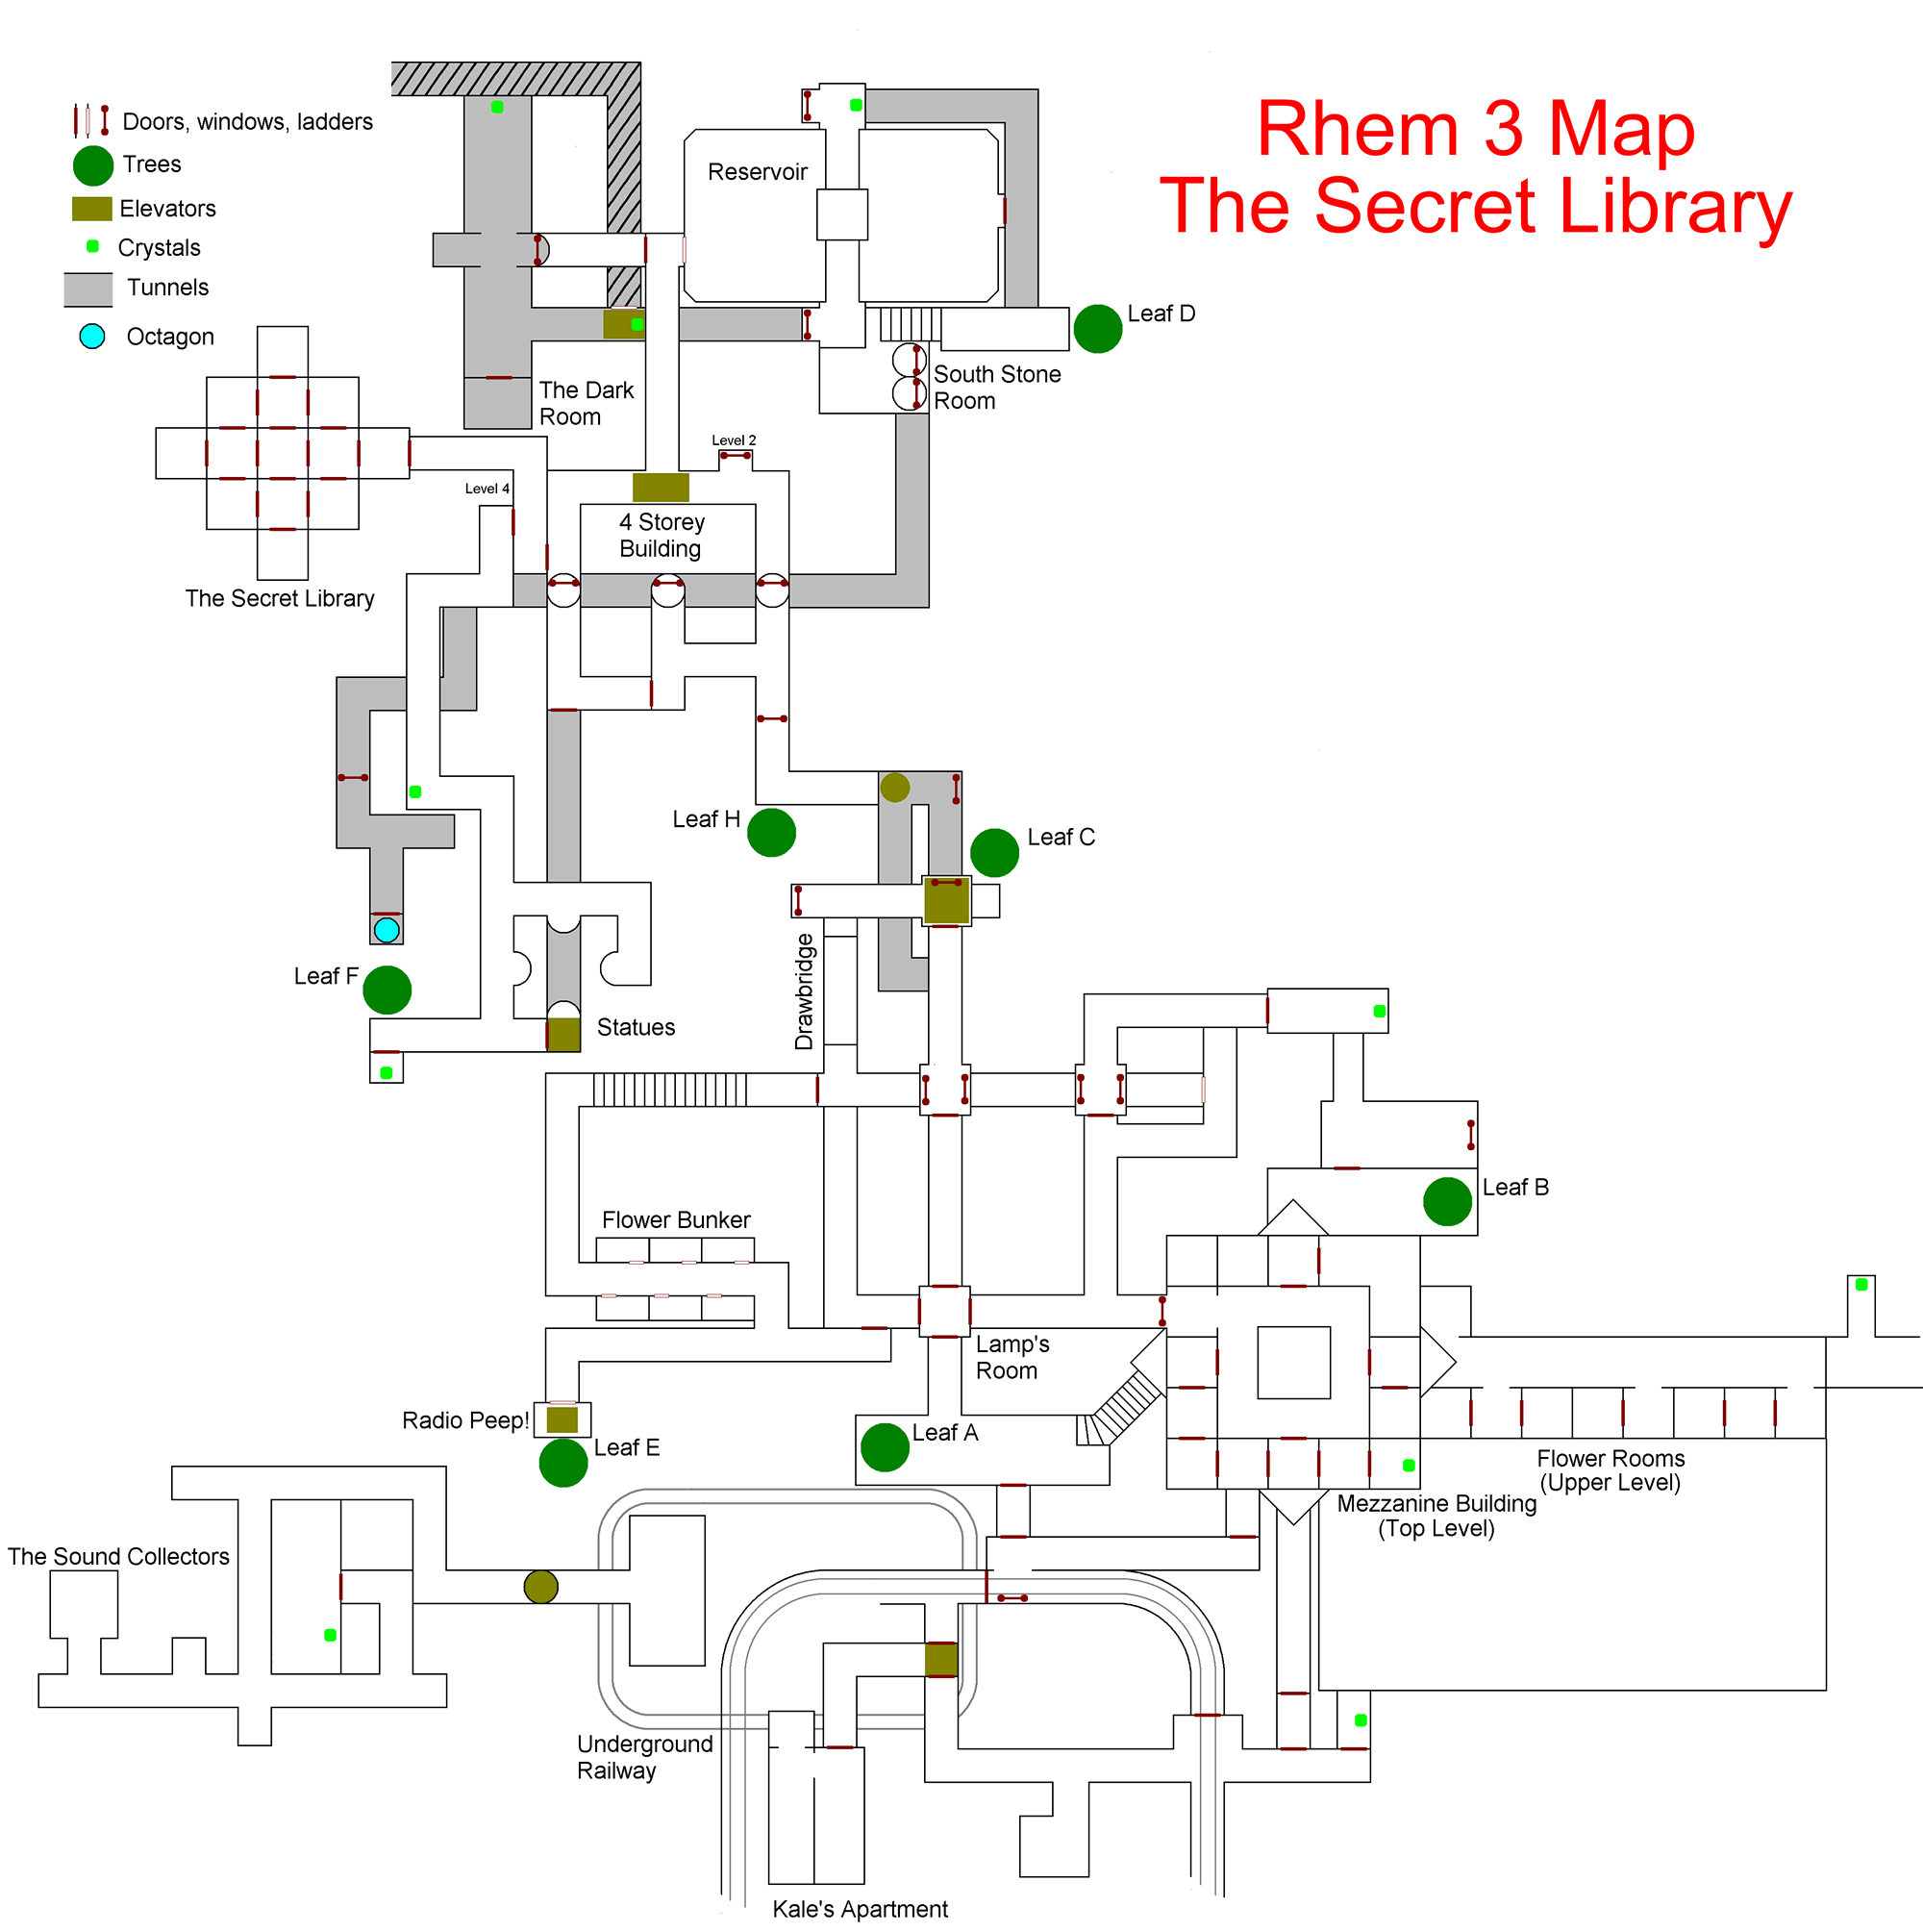
Welcome to the Rhem 3 walkthrough. Just like its predecessors, Rhem, and Rhem 2 this game is one gigantic puzzle. A map is essential as is a note book.
You can play Rhem 3 – The Secret Library in two ways: as a straight forward adventure game or with all the hidden extras.
This walkthrough is for the version with the hidden extras, the only difference being the amount of walking we have to do.
The biggest aid to navigation is the compass at the bottom of the screen. Where relevant I will tell you which way to face and indicate the direction in brackets like this: turn left (E), which means turn left to face east.
Other things at the bottom of the screen are your inventory (a box) and a book which you will fill later when you reach the secret library. On the right is a wheel that takes you to the main menu.
Big hint: look behind things. Make sure you examine the back of every door, underneath every elevator, behind every panel.
And if you get lost, here is a map (150kB).
Arrival | The Lamps Room | 4 Storey Building and Reservoir | The Dark Room | The Secret Library | Bunker Puzzle | Mezzanine Building | The Apartment | Statues | Reservoir Cavern | Underground Railway | Radio Compound | The Black Crystal
After listening to Zetais you once again you start your journey into Rhem on a train. When the train stops, look right and listen to Kales. Get the picture from your inventory (the box bottom left of the screen) and slide it into the slot. Turn left and press the button.
ARRIVAL
The train stops and you can get out and stretch your legs. Exit left (W) and look around. In the cave office is a drawing, a control panel and pictures of Rhem 1 and Rhem 2. Leave the cave and go left. There is another locked door round the corner.
Go back to the train and out the other side. The both doors are locked. Head back to the train and examine the monitor on the fence on the right.
Note the 5 pointed star. Press the button on the monitor and Kales tells you about the Relic and the means to enter Rhem. Into the train now and press the button when the gate opens.
When you finally stop jump out and face the hatch. Turn right (E) and go to the door. Press the button and enter the Lower Mezzanine Floor. There are 4 doors and a small balcony. To the right of each door is a panel covering a complex lock. Look up, you can see that there are three floors in total. Not much you can do here so leave the building and return to the hatch.
Press the green button and climb through the hatch. Off to the right are some stairs leading to the Second Mezzanine Floor. Again there are 4 locked doors.
Leave the Mezzanine Building and go forwards to the tree. Examine the tree. Listen to the sound of the bird (long, short, long) and take Leaf A.
Go right and press the button to open the door.
THE LAMPS ROOM – GATHERING INFORMATION
Press the square button to the right of any of the closed doors and a lamp flickers. Press the round button under the lamp to turn it off. Spin round and turn off the next flickering lamp that you see. Continue to do this until all the lamps are extinguished and the door opens (closing the one you entered by). This puzzle is completely random – there is no pattern to the sequence of lamps except that first and last lamps are those either side of the door you want to open.
West Door
Exit the lamps room, turn left (S) and press the button to open the door. Through the door, turn right (W) and out into the open. The path in front leads to a tree on the south side of an archway. Examine the tree. Listen to the sound of the bird (long, long, long) and take Leaf E. On the right is a Hand that looks like it should do something but doesn't. Look right and you can see an antenna.
Back the way you came and turn left (N) along the path leading to the Bunker. Examine the 6 machines. On the wall is a strange word and a three digit readout surrounded by puzzle pieces. Exit to the west onto another path. On the left (S) is a control panel that raises and lowers an elevator where you stood to get the leaf. If you lower the elevator using the second button you get a readout on the 'hand'. Keep pressing the button until the readout reaches its maximum (30). Now press button 3 and timer counts down. If you can get to the elevator before it reaches zero you can press the hand to go up.
In the upper room there is a strange radio and some panels that requires a lot more info before you can get anything to work. On one wall is a little bird that sings when you touch the picture – there must therefore be link between the birdsong in each tree and the radio...
Pull the ring above the radio to go down and go back through the Bunker. Turn right (N) and follow the path round the corner up a long flight of stairs. Unlatch the door. The button doesn't work yet. Back the way you came, through the Bunker, left into the tunnel and through the door you opened earlier. Turn round (S) and press the button to close the door.
Turn round and follow the path on the left through a tunnel to a raised drawbridge. Note the purple cable on the poles.
Return to the Lamps Room
East Door
In front is a ladder that leads to the Upper Mezzanine Floor. Once again, 4 locked doors. Back down and go through the archway to the north. Note the broken door opposite. Follow the path to a control panel facing a dock. Turn the red switch until the bridge rises. Note the position of the switch and the shape above. Lower the bridge and return the switch to blue dot – don't forget to do this!
Return to the Lamps Room.
North Door
Cross a bridge to the door. Press the button and enter. Wait for the lights to illuminate. Turn left (W) and look up. Open the hatch and a ladder drops down. Climb the ladder and go forwards to the door. Lift the latch and press the button. Recognise where you are? Go down the stairs and follow the path through the bunker to the door you closed a little while ago. Note the red squares and triangles on the back of the door.
Back the way you came, through the bunker, up the stairs and through the door. Turn left (N) and go outside. Press the button and the lamp on the left turns green. This unlocks something over on the far gantry.
Back to the ladder, climb down and up the other side (heading east). Through the tunnel and down the ladder. Turn left (N) and follow the path down the ramp. Another locked door and a control panel on the right this time displaying alternate coloured squares and triangles. Back to the ladders. Go up the ladder on the left (E) and along the tunnel. At the end is a switch on the right of the window. Turn the red switch until the bridge rises (if the bridge doesn’t move it’s because you didn’t reset the switch down below in the dock). Note the position of the switch and the shape above. Lower the bridge and return the switch to blue dot.
Back down the ladder and return to the tunnel with the lights. Turn right (N) and wait for the lights again. Go forwards and the door closes behind you. Forwards to the elevator and open the doors. Go right (E) and examine the tree. Listen to the sound of the bird (short, long, long) and take Leaf H.
Back into the elevator and press the button to go up. Exit the elevator and go to the switch on the left rail. Press the button to lower the drawbridge. Open the hatch on your right and climb down the ladder. Step smartly across the drawbridge and return to the Lamp Room.
Exit north and go forwards through the door to the Main Elevator. Do not call the elevator, open the doors and climb down the ladder. Note the opening on the wall in front of you. Turn round, forwards and then right. Note the control panel on the right of the door. The image seems to indicate that you can hold the doors open. Through the door and go halfway along the access tunnel. On the right is a red button. Press it and doors open and close. You need to get both sets open at once. Go back to the now closed doors you came through and note the pattern marked on the back.
Back to the red button and open the doors again. Return to the control panel and match the pattern you saw. If you get it right, these doors should now be locked open.
Back to the red button and press it to open set of doors to the north. Face these doors and press the down button to call the Circular Elevator and step inside. Go down and note the pattern painted on the wall - its the sequence that unlocks the door at the bottom of the ramp (you can go and unlock the door if you want).
Go up. Exit the elevator.
Go through the doors at the other end of the access tunnel and call the Main Elevator. Back to the Circular Elevator controls and press the down button to reveal a second platform. Forwards and go up then up again. Exit the Circular Elevator and climb down the ladder. Note the tunnel on the painting. Pull the picture off the wall. Look at the back of the picture and note the three ring patterns.
Look up and pull the ring to open the curtains. Open the panel and note the three ring patterns on the back of the Main Elevator.
Up the ladder and into the Circular Elevator and do down once. Exit the elevator. On the left is another tree. Listen to the sound of the bird (long, long, short) and take Leaf C.
Turn round and go through the archway
THE 4 STOREY BUILDING
Before you climb down the ladder look down. Note the three manholes and two ladders on the eastern and western end of the building.
Look up. Press the red button to lower the ladder. Climb down and cross into the 4 Storey Building.
Just before the corner is a green button that should raise the ladder, except it doesn’t. Note the purple conduit. Turn the corner and go into the alcove. Climb the ladder to Level 2. Turn right (E) and go round the corner. Note the purple conduit. At the end is a recess on the left. If we can find the key we should be able to raise and lower the ladder.
Back round the corner. Halfway across the gap is a doorway on the right that we can't get to yet.. Climb down the ladder to Level 1, leave the building and take the pathway on the right. The gate is locked so out only option is to go down the manhole on the right (N). Climb down the ladder. Turn right (E) and see a button that lowers the ladder. It doesn’t work because the ladder is already lowered. Just ahead is another ladder. The exit is blocked by the ladder at the eastern end of the 4 Storey Building. Keep going round the corner and up the ladder at the far end. Open the hatch and enter the South Stone Room.
RESERVOIR
Note the scratches on the door to the north.
Climb the wooden stairs and go to the far end of the path. Examine the tree. Listen to the sound of the bird (short, short, short) and take Leaf D.
Turn round and note the display panel and blue conduit next to the doorway. Down the stairs and up the ladder on the west into the office. Note the picture on the left of the doorway. The three images seem to indicate the three conditions of the bridge: floating, at the bottom and locked in the upper position.
Turn left (S) and note the chalkmarks on the slate. Touch the slate and Key C falls out. Pick it up, it matches the recess on level 2 of the 4 Story Building.
East is a locked switch next to the window. The blue conduit leads to the display panel you saw earlier.
Turn left (N) and enter the reservoir. Turn left and note the cable and window opposite. Onto the middle of the bridge. Open the cover in the centre of the lower platform, look down and open the red panel. The central gear wheel is missing. If we find the missing gear wheel we should be able to lock the bridge in the upper position.
On the north of the bridge is a panel with an inoperative red button and green conduit.
Back into the office and down the ladder to the South Stone Room. Flip the manhole cover over to the right. Down the left ladder and note the panel with 6 septagons and two orange cables leading through a hole. Back up the ladder and flip the manhole cover over to the left.
Lets go and put Key C where it belongs. Down the right-hand manhole and follow the tunnel to the far ladder. Back up and round to the 4 Storey Building.
THE 4 STOREY BUILDING
Inside and round the corner to the alcove. Up the ladder and round to the recess. Put Key C into the slot. Back down to level 1 and try that button.
The ladder rises – hooray. Back up to level 2 and round to the raised ladder. Climb up to Level 3. Turn round and go to the switch box on the corner. This raises and lowers an elevator. Bring the elevator down and cross to the other side. You now have access to the ladder on the west side of the 4 Storey Building. Down the ladder and along the tunnel. At the end you can see the ladder you saw on the picture behind the Main Elevator. Up the ladder and examine the two huts. One has a control panel and the other has an image on the door indicating that there is another panel. It's in the hut over to the left.
Back out the way you came and return to the elevator controls. Press the
down switch. Turn round and climb down the ladder to Level 2. Cross to the
west side of the building and climb down the ladder to Level 1. Turn round
and go to the door. The top green button unlocks the door and the lower
yellowish button opens it.
Climb up to Level 2, go to the elevator and go through the doorway into
the side passage.
 At
the end is a panel. Use the clues from the door scratches and the slate
to press the button in the correct sequence.
At
the end is a panel. Use the clues from the door scratches and the slate
to press the button in the correct sequence.
Turn right and look out the window. Recognise where you are? You can see that the bridge has three platforms, two of which are accessible only from the south side. Note that there is panel on the lower door to the right of the bridge. Press the green button to open this door. Back to the main corridor now and climb down to Level 1. Press the button to lower the east ladder.
RESERVOIR
Exit the 4 Storey Building, go to the manhole and climb down. Follow the tunnel to the far end and climb the ladder to the South Stone Room. The door to the elevator lower level is now open.
Out through the now open door and onto the middle of the bridge. On the left (W) is a panel with a 3 position switch that points to a violet, grey and green dot.
Turn the switch to the right (green conduit). Turn left and go into the South Stone Room, climb the ladder on the west into the office. Out onto the bridge and press the red button to collect the Right Fragment.
Back down the lower level and go to the three position switch. Turn the switch to up position (grey conduit). Turn round and note the grey conduit leading to the back of a display box.
Turn right (N) and into the North Stone Room. Note the control panel with 6 buttons and six displays. Turn left (W) and down the ladder. Follow the access tunnel to the southern end. You are now above the tunnel where you saw the closed panel with 6 septagons. Open the two green distribution boxes and press the buttons. One powers the orange cables and the other the locked switch in the office (with the blue conduit).
Turn right and press the button to drain the reservoir. Back along the access tunnel to the Watertight Hatch. Press the red button and enter the reservoir.
Forwards and press the red button – note the sequence that appears.
Turn left (S) and note the sequence on the round panel (the back of the panel with the 6 septagons).
Return to the access tunnel and go right to the porthole. Press the green button to refill the reservoir.
Back along the access tunnel and up the ladder to the North Stone Room. Cross the bridge to the 3 way switch. Flip it round to the lavender conduit (left). Turn left (S) and open the panel on the right of the doorway. Press the button and something opens.
Into the south stone room and climb the ladder to the office. Open the switch by the window and press the button. A green light and a ding sounds good. Down the ladder and up the wooden stairs. Turn right, press the lavender button and note the sequence that appears.
Back down the steps and go to the manhole. Flip the cover over to the right and go down the left ladder. The switch you pressed on the bridge should have opened the cover revealing an reservoir drain button. Press it.
Turn about and climb the ladder to the stone room. Climb the ladder to the office and out onto the upper bridge platform. On the left is a panel. Press the button and note the sequence that appears.
Turn round and open the panel using the green button. Get the right fragment from your inventory and slot it into the recess.
Back into the office and down the ladder. Climb down the left manhole and refill the reservoir. Climb back up to the stone room and out onto the bridge. Cross to the north stone room and examine the control panel.
Using the sequences you have collected enter the codes from the septagonal sets:
![]()
![]()
713358. Turn right and open the panel. Collect the Gearwheel.
Back across the bridge to the stone room and up the ladder to the office. Out onto the bridge and open the two covers. Fit the gear wheel from your inventory and close the red cover. Press the red button and the locks engage (a gap in the middle of each lock). Back into the office and down the ladder. Cross the bridge to the North Stone Room and down the ladder. Follow the tunnel to south end and press the reservoir drain button. Back to the Watertight Hatch and out into the reservoir.
The bridge should now be held in the upper position. Look down at the grill beneath the bridge and pick up the left fragment. You can open the grill and explore if you like – you might be surprised where you end up.
We now need to get back to the upper bridge level to fit the left fragment.
Back to the access tunnel and round to the south side. Refill the reservoir. Back along the tunnel and up the ladder to the North Stone Room. Cross the bridge, up the ladder to the office and out onto the bridge. Open the metal cover and press the button to release the locks. Into the office and down the ladder. Down the left manhole and drain the reservoir. Up the ladder and and up again to the office. Out onto the upper level and go to the panel on the right. Press the green button and fit the left fragment into the recess.
Turn left and press the red button. The gate opens. Forwards to the 6 button panel and this time use the sequence from the hexagonal codes:
![]()
![]()
492832. Turn right and press the red button. Open the cover using the knob and collect Green Crystal 4.
Nearly done here. Next stop is that grill under the bridge.
Back to the office and down the ladder. Down the left manhole and refill the reservoir. Up the ladder and up again to the office. Out onto the bridge and open the cover. Press the red button to engage the locks. Down the office ladder and cross the bridge to the North Stone Room. Down the ladder and round to the south side. Drain the reservoir. Open the Watertight Hatch and out into the reservoir.
Open the hatch and climb down. A bit drippy here. Turn left and note the hidden panel on the right hand door. Out onto the suspended walkway. Go forwards and note the ring pull on the left. This closes the door you have just come through. Forwards to the grill on the right. Say hi to the Lady In Red.
You need to find an Octagonal piece to help find a green crystal.
Press the button to go up. Turn right to see a recess that will hold the Octagonal Piece. Turn right and collect the Old Key. Turn right to see a locked panel (guess what’s behind it), Turn right again and press the button to go down. Turn left and forwards.
Just before the doorway on the right is an image on the wall. Note the position of the number in the quadrant.
Through the doorway and turn right. Note the paintings of the man and woman. Forwards again and examine the machines. At the far end is a locked panel and a plaque above with some strange words.
Turn about and exit the room. On the right is a platform with a ring pull that activates the machines. Turn about and climb the ladder.
Release the latch on the door and press the button. You are back in the 4 Story Building.
Press the button to close the lower reservoir door (we are going to see what is on the back of the door). Turn round and back down the ladder. Back through the underground chamber and up the ladder to the reservoir. Through the Watertight Hatch and go right. Press the button to fill the Reservoir. Exit the tunnel to the North Stone Room and across the bridge.
Examine the image on the door. We seem to have a correction to a series of triangular sequences (you already have one of them).
Next up is the panel on the back of the underground door (below the reservoir).
Back to the North Stone Room, down the ladder and round to the far end. Drain the reservoir and out through the watertight door. Open the grill and down the ladder. Out onto the suspended walkway and step just past the ring pull on the left. Turn round and give the ring pull a yank. The door closes. Turn round, forwards, right and right again. Climb the ladder. Out through the door and press the green button to open the lower reservoir door.
Turn right (S) and forwards. Left to the alcove and down the ladder. Leave the 4 Storey Building and go right to the manhole. Down the ladder and follow the tunnel to the third ladder. Climb to the South Stone Room and cross the bridge. Down the ladder and out through the Watertight Door into the reservoir. Open the grill and down the ladder. Note the green squares and triangles on the back of the door.
Back the way you came now: up ladder, into the tunnel, left to end and up ladder. Cross the bridge and down the right manhole. Follow the tunnel to the end and up the ladder. Re-enter the 4 Storey Building and climb the alcove ladder to level 2. Into the side passage and open the door at the end.
THE DARK ROOM
Back down the ladder to the cavern. Turn right and go the door with the red buttons either side.
Press the left button to open the door. Inside are 3 curtains. Pull and hold the ring pulls to see something quite drab. Face the door and press and hold the big red button. 5 squares light up (5 seconds) and a light sensitive image appears on the right of the door. Note the shapes with the L and N below.
It seems that this room has some secrets (like most of Rhem). Exit and close the door.
Press the button on the right to turn on the lights and open the door again.
Open each of the curtains and examine the pictures now in glorious technicolour.
There is a skull with a missing tooth and a double cone.
The pattern of teeth might be quite useful to note. There is also picture of a man with a sphere and another with a mandolin.
Let’s experiment with darkness. We should be able to charge up each painting in the light, turn off the lights and see if anything is hidden. Hold open the curtains of the man painting for 5 seconds. Exit the room, close the door and turn off the lights. Open the door and open the curtains of the man painting. Note the image on the paper.
Exit the room, close the door and turn on the lights. Open the door, hold open the curtains of the mandolin painting for 5 seconds. Exit the room, close the door and turn off the lights. Open the door and open the curtains again. You should see an image on the mandolin.
All done here.
Exit the dark room, forwards through the doorway. Climb the ladder to the side passage in the 4 Storey Building.
THE SECRET LIBRARY
We now need to explore level 4.
Exit the side passage, go right and press the button to lower the West Ladder. Back to the alcove and down to level 1. Raise the East Ladder. Back up the alcove ladder and climb to Level 3 using the East Ladder. Raise the elevator to Level 4. Back down the ladder and down again to Level 1. Turn left (W) and open the door at the end. Cross the East Ladder (now a bridge). The door ahead is still locked (the release is on Level 4). Turn left and open the gate. Down the manhole, turn right and climb the next ladder. Continue climbing the East Ladder to Level 4. Round to the east side and press the button by the window to unlock the door down below.
Phew!
Turn right and open the door to the Secret Library. Enter and turn round. Press the button to close the door. This reveals a button on the left of the door. Press it and something unlocks. Left and forwards to the cabinet on the wall. Open the doors.
This is a control panel to open and close doors in the Library. Click on the door you want opened and it goes green. The door opposite closes and goes red.
You need to visit every room. In some of the rooms are books. You can see where the books are if you click on the open book next to your inventory. When you find a library book, look at each page and take a picture using the book to the right of your compass (with a cross on it). This book only appears when you have a page to photograph so don't worry if you can't see it yet. Check your progress using the library book – make sure you photograph every page.
Some of the books contain syllables similar to those you saw in the Bunker. Note the puzzle pieces on the wall above these books.
There are 17 books in all. I numbered them 1 to 9 on the top row of my library book and 10 to 17 on the bottom row:

In two of the rooms are pieces of a pattern you should note and in one of the books is a leaf you will need.
There are any number of ways to make the journey. This is how I did it.
Route 1
 Go
W S (books 16 and 17) W N W N (books 3 and 4) E N (books 5, 6 and 7). Note
the image on the wall to the south.
Go
W S (books 16 and 17) W N W N (books 3 and 4) E N (books 5, 6 and 7). Note
the image on the wall to the south.
Back to the control panel (S W S E S E N E).
Route 2
 Go
W N (books 8 and 9) W S W (books 11 and 12 - take Leaf G) S E S (books 13,
14 and 15). Note the image on the wall to the south.
Go
W N (books 8 and 9) W S W (books 11 and 12 - take Leaf G) S E S (books 13,
14 and 15). Note the image on the wall to the south.
Back to the control panel (N W N E N E S E).
Route 3
 Go
W N W S S W N W (books 1, 2 and 10).
Go
W N W S S W N W (books 1, 2 and 10).
Back to the control panel (E S E N N E S E).
Make sure you have all the pages for every book.
On your way out, look at the picture of the tree. A click returns a peep and a bird flies off. Turn round, note the red book and the puzzle piece on the wall. A good guess is that the leaves go in the book – there are 8 pages and we have six leaves so far. All 8 leaves in the right order should open the door round the corner.
Round the corner and press the yellow button on the left wall to open the door.
Time now to explore that door down below we have just unlocked.
Go to the East ladder and climb all the way down. Turn left, forwards, turn round and press the button to lower the ladder. Up the ladder on your left and enter the 4 Story Building. Along the corridor and open the door. Across the west bridge and open the door using the red button. Inside on the right is are the huts you looked at a while back. Forwards and into the hut. Press the yellow button to open the doors.
Use the ring pattern from the back of the Main Elevator:

and the clues from Book 4 to set the three lamps:

Exit the hut turn right and open the elevator, go up and explore if you like – you should discover 4 statues, a locked door and panel which I'll bet contains a green crystal. Back down in the elevator exit and forwards to the door.
Exit and back across the ladder. Go to the East end of the building and press the button to raise the ladder. Up the alcove ladder and up the East Ladder to the third level. Lower the elevator to Level 2. Back down the level 2 and cross to the west side. Press the button to raise the West Ladder. Climb the East Ladder to level 3. Raise the elevator to Level 3 and cross the other side. Down the West ladder to the bottom. Follow the tunnel to the end and climb the ladder. Forwards onto the hut and press the yellow button to open the doors.
Use the ring patterns from the back of the picture:

and the clues from Book 4 to set the three lamps:

Exit this hut, go left and forwards to the other hut. Press the yellow button and the door opens.
Inside on the left is a keyhole. Use the old key to unlock the panel on the right. Press the button and collect the octagonal piece.
Press the button again and note the blue squares and triangles pattern.
Time to visit the lady in red again. There are at least two ways to get there but this the quickest.
Exit the cavern via the tunnels and climb the ladder to Level 3. Cross the the east side and lower the elevator to Level 2. Climb down the East Ladder to Level 2 and take the side passage to the end. Open the door on the left and climb down the ladder. Turn right (S) and go to the suspended walkway. Forwards to the grill and press the button to go up. Turn right and place the Octagonal Piece in the recess. Turn round and pull the golden knob to collect the Green Crystal 9.
Press the button to go down and the Lady in Red thanks you.
The next task is to decipher the machines in the bunker.
Back the way you came and climb the ladder. Through the door and right into the 4 Storey Building. Go east and down the alcove ladder. Press the button to lower the East Ladder and exit the building. Up the ladder and into the Circular Elevator. Go down. Follow the access tunnel to the end and climb up the ladder, exit and lower the elevator. Step inside and go up (to leave the ladder available later) exit west, down the ladder and over the drawbridge. Left at the end then right. Open the door. Step outside and go right into the bunker.
THE BUNKER PUZZLE
Each of the 6 panels has a set of interlocking jigsaw pieces and a numerical readout. On the wall is a word.
All the clues you need are contained in the library books. You should (I hope) have linked the jigsaw pieces with specific books. I distinctly recall reminding you to do this.
At each station note the shape of the puzzle piece for each of the three displays. Now take each word and break it down into three syllables. Go to the book for each puzzle piece and flick through until you find the associated syllable. Note the page number – this is the bit you need.
Example. The first machine has the syllables: Bwen Ti Stor.
 The
puzzle shapes relate to books 7, 10 and 15.
The
puzzle shapes relate to books 7, 10 and 15.
Bwen is on page 9 of book 7.
Ti is on page 1 of book 10.
Stor is on page 9 of book 15.
This gives us the settings: 9 1 9.
Top tip: the 10 syllables appear in all 9 books so you can't cheat!
It takes quite a while but if you can’t wait here are the solutions:
Bwentistor: 9 1 9
Xixornes: 5 5 3
MIhdnesti: 5 5 10
Xornesdov: 4 5 10
Tirebnes: 2 2 4
Strovohmbwen: 7 7 6
Set each of the numerical displays, press the red button at each station and note the colour and shape of the flowers that appear.


Exit the bunker to the west.
Examine the control panel. You can raise or lower the bridge using the buttons. When the bridge is up, use the second button to lower the bridge. The readout on the hand is a timer, set it to the maximum by clicking on the second button. Now activate the timer using the third button.
Run through the bunker and round to the right. Stand in front of the tree and touch the hand on the right. The elevator should rise.
In front of you is a frequency dial. To the left and right are panels with a letter and coloured buttons. The solutions are in book 12. On page 2 are blue and orange numbers. Look for a D and note the numbers. Do the same for the grids on pages 3 and 4.
D: blue 3 and orange 8.
K: purple 6 and yellow 9.
W: red 8 and green 4.
The last page of the book gives us frequency of 134.
Set each of the panels to the correct values and face the radio. Press the top button to turn it on and move the indicator to 134. Listen and note the sequence of sounds. There are 8 in total. The sounds indicate the order in which the leaves need to be place in the red book outside the Secret Library.
Turn round and take the golden cylinder from the shelf below the window. Turn back to the radio and pull the ring to go back down.
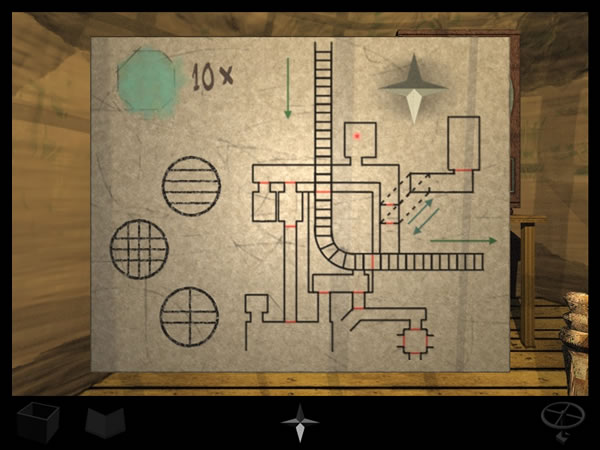
Go back to the Bunker and out the other side, follow the path and climb the stairs to the door. Press the red button to open the door. Forwards and down the ladder. Up the other side (and hear the doors close behind you). Forwards and down the next ladder. Turn left (N) and go down the ramp. Examine the control panel on the right. Remember seeing a sequence painted on the wall below the small elevator:
![]()
Replicate the sequence and you will hear a bell. Turn left and press the button to open the door. Inside is a control panel with yet another bridge switch. Turn the red switch until the bridge rises. Note the position of the switch and the shape above. Lower the bridge and return the switch to blue dot.
Back the way you came, up the ladder on the west and down the other side. The door has mysteriously opened giving you access to the Lamps Room north door.
THE MEZZANINE BUILDING
Enter the Lamps Room and exit through the East Door. Forwards and climb the ladder to the top Mezzanine Floor.
The Upper Floor
Examine the three panels on each of balustrades. Each one is the key to the locks on the door behind the balustrade. The solution lies in book 6.
Each panel on the balustrade has up to three lines. You need to match these lines with the blue images in the book. So for example, the south door has these three patterns:

Now look at Pages 5 and 6 of Book 6 and the image below. The red lines replicate those of the middle panel, the blue lines are those for the right panel. The red and blue squares show there the three lines intersect. Note the patterns as these is the codes needed to unlock the door. You need to do this for all 12 balustrade panels.

Notes: If the pattern only has two lines then you need to select a third line that is the same as one of those you already have. There is often more than one solution for each pattern.
Once you have the keys you can go to each of the doors and open the panel on the right. Press the buttons until you match the three patterns, close the panel and press the red button to open the door:
 |
 |
 |
 |
| North | East | South | West |
Once you have unlocked all 4 doors open the north door and examine the map inside. The red dots are buttons that open the gates between each of the rooms. Now take a look at book 16, it tells you which button opens which gate. You need to get to the blue box. However, a quick check will tell you that opening a gate also takes away the button next to that gate.
In the image below, the buttons are numbered A to H and the gates 1 to 8. All you need to do is open doors 5 and 6 and you are home and dry. Hah!
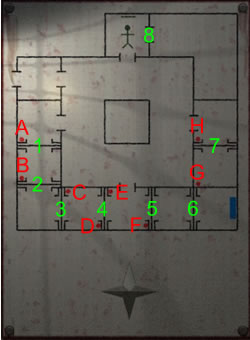 There
are a number of ways to open the doors, this is just one of them:
There
are a number of ways to open the doors, this is just one of them:
West Door: press A to open 2
East Door: press H to open 1
South Door: press E to unlock 8 and press F to open 3
West Door: press D to open 7
East Door: press G to open 6
West Door: press D to close 7
South Door: press F to close 3
East Door: press H to close 1
West Door: press A to close 2
East Door: press H to open 1
West Door: press B to open 4
South Door: press C to open 5.
Turn around go get Crystal Number 2.
Go to the North door and inside you should see that the door is now open. Follow the balcony round and see a useful post-it with a light blue circle and a control box above.
Back to the mezzanine floor and round to the East door. Inside on the left is a window. Open the panel and press the button until you have a light blue light. Back to the North Door and the balcony. The control box is now activated, you can press the buttons if you like but without the sequence it’s unlikely you will solve the puzzle.
All done here, so let’s take a look at the middle level.
Middle Mezzanine Level
Exit the building and climb down the ladder. Into the Lamps Room and out the South Exit.
Turn left and climb to the stairs at the far end. Repeat the process you carried out on the upper level to obtain the sequences to unlock the doors:
 |
 |
 |
 |
| NW | NE | SE | SW |
NW Door
Take Key B.
SE Door
Take the Double Cone (remember seeing this on the skull picture).
SW Door
Take the Isocaeder.
NE Door
Go to the end of the balcony. Turn round and look up, on the end is a sequence that will help us solve the three puzzle we saw on the top level balcony (you can go and do it now if you want).
Into the corridor and note the three doorways. If you explore on your own you will discover that there are 8 rooms on this level and another 8 down below. These rooms have combinations of coloured flowers on the walls, paintings, windows and control panels.
Enter the first room. Note the officer, the impossible triangle and the insignia on his chest. Turn right and enter the orange flower room.
Orange flower Room.
Examine
the round screen. Press either paddle until you match the pattern on the
screen with the flower shape you saw in the bunker.
Close the window blind.
Exit the room, turn round and press the green button to close the door on this level and open it on the level down below.
Take a look at the other rooms on the corridor - all the other doors are closed. Leave the corridor and return to the middle mezzanine floor.
Down the stairs and take a look at the hatch. There are 8 buttons on the hatch.
If you examine book 11 you will see a whole bunch of sequences. On pages 6 and 7 are sequences with 8 numbers:

Close the book and press the buttons on the hatch to match the orange sequence. Step back and press the orange button. Climb in the hatch and note the symbol on back of the outer hatch.
Turn round, exit and close the hatch. Press the orange button again and climb through the hatch. Turn round and repeat the process this time using the green sequence. Step back and press the green button. Climb in the hatch and note the symbol on back of the inner hatch.
Turn round, exit and close the hatch. Turn right (E) and go to the open door. Press the red button and enter the Lower Mezzanine Floor.
Lower Mezzanine Floor
Go out onto the balcony. Look to your left. There are a bunch of windows. In the secret library you found two broken pieces. Match them up and you get a pattern:

You need to close the windows in the rooms on this level and above to match the pattern. The window in the orange flower room is hidden but since we have already closed the blind all should be ok.
Four more doors to unlock. Repeat the process you carried out on the upper and middle levels to obtain the sequences to unlock the doors:
 |
 |
 |
 |
| North | East | South | West |
North Door
Go forwards to the tree. Examine the tree. Listen to the sound of the bird (long, short, short) and take Leaf B.
Turn left and open the door using the ring pull. Inside, open the cabinet and turn the red switch to raise the bridge. Note the position of the switch and the shape above. Note the position of the switch and the shape above. Lower the bridge and return the switch to blue dot. Turn right and climb the ladder. Go to the bridge exit and press the yellow button on the right to get power across the other side. Back down the ladder and open the panel. Turn the switch to raise the bridge. Back up the ladder and across to the other side.
In this room there are four covered panels with symbols above each. Press the button to open the cover. Rotate the line to match the symbol above each panel then press the button corresponding to the position of each switch:


When everything is set, go to the panel on the wall and press the green button. Pull on the knob and collect Green Crystal 3.
Back the way you came and re-enter the Lower Mezzanine Floor.
West Door
Take the A key.
South Door
This leads to the outer Rhem perimeter. You can use the A and B key to get out and open the door on to the east and see the window arrangement if you like - it will show you which one needs to be closed.
East Door
You are now in the lower corridor.
Go into the first room and note Napoleon, the ring and the insignia on his chest.
Turn left and enter the green flower room.
Green Flower Room
Examine the paintings on the wall, Use book 14 to decipher the hand signals: left is UAF and right is FYQ. Note the earrings of the woman: black, black, black.
Leave the blind open.
Cyan Flower Room
Use
the paddles to match the patterns to that of the cyan flower.
Examine the paintings on the wall, Use book 14 to decipher the hand signals: left is PUZ and right is LUZ. Note the earrings of the woman: black, white, black.
Close the window blind.
Exit the room, turn round and press the green button to close the door.
Back to the corridor and onto the next room.
Face the exit door and note this drawing of 4 faces.
Turn right and enter the blue flower room.
Blue Flower Room
Examine the paintings on the wall, Use book 14 to decipher the hand signals: left is LAL and right is QYP. Note the earrings of the woman: black, black, white.
Close the blind.
Exit the room, turn round and press the green button to close the door.
Back to the corridor and onto the next room.
Note Washington, the rod and the insignia on his chest.
Turn left and enter the red flower room
Red Flower Room
Use
the paddles to match the patterns to that of the red flower.
Leave the blind open.
Exit the room, turn round and press the green button to close the door.
Back to the corridor and return to the Lower Mezzanine floor.
Go to the balcony and check your window progress – the lower level should be set.
Exit the building and go back through the hatch. Climb to the Middle Mezzanine floor and open the NE door. Out onto the balcony and into the corridor.
Into the first room and enter the yellow flower room.
Yellow Flower Room
Use
the paddles to match the patterns to that of the yellow flower.
Examine the paintings on the wall, Use book 14 to decipher the hand signals: left is ALL and right is PAC. Note the earrings of the woman: black, white, white.
Close the blind.
Back to the corridor, onto the next room and enter the grey flower room.
Grey Flower Room
Examine the paintings on the wall, Use book 14 to decipher the hand signals: left is AGY and right is APA. Note the earrings of the woman: black, white, white.
Leave the blind open.
Back to the corridor, onto the last room. Note the Trooper, the spiral and the insignia on his chest. Turn right and enter the Green Flower Room.
Green Flower Room
Examine the paintings on the wall, Use book 14 to decipher the hand signals: left is ZYG and right is YFY. Note the earrings of the woman: white, white, white.
Close the blind.
Purple Flower Room
Use
the paddles to match the patterns to that of the purple flower.
Examine the paintings on the wall, Use book 14 to decipher the hand signals: left is UPA and right is GAF. Note the earrings of the woman: white, black, black.
Leave the blind open.
Exit the room, turn round and press the green button to close the door.
Return to the Lower Mezzanine floor (out the corridor, down the stairs and through the hatch).
Enter the corridor via the east door and walk to the far end. Enter the Washington room and turn right.
White Flower Room
Use
the paddles to match the patterns to that of the white flower.
Examine the paintings on the wall, Use book 14 to decipher the hand signals: left is LUZ and right is CAL. Note the earrings of the woman: white, black, white.
Leave the blind open.
Exit to the corridor.
You should now have:
Set the 6 screens to match the flower patterns.
Noted the hand signals of 8 men and earrings of 8 women.
Set the blinds to match the diagrams from the secret library

Turn right (E) and press the red button to open the door. If it doesn’t – it means you haven’t set the flower patterns correctly.
All the way down the stairs and have a look at an old friend – the cavern from Rhem 2. The equipment doesn’t work anymore but if you turn round you can see a box on the right. It’s locked but there is a 5 pointed star…
Back up the stairs and go through the doorway on the right. At the end of the promontory is a box containing green crystal 5.
Return to the corridor and exit to the Lower Mezzanine Floor.
Check the window blinds and exit through the South Door.
Across the bridge and examine the box on the right. Place key B in the recess, turn left and open the door. Out the other side and turn left.
Open the box next to the door and place key A in the recess. Close the cover and press the button to open the door.
Inside is a window and a control panel. Press the red button to see the windows you have been opening and closing. Press the green button to scan and check the arrangement. If you are correct you are rewarded with a green light and a ding. Turn right and press the button to open the panel. Collect Green Crystal 8.
Exit the room.
THE APARTMENT
Go to the rail tracks and turn right. Have a look at the back of the video screen. Pull down the lever and go to the front of the video screen. Press the button and note the position of the number 3 in the grid.
Cross the tracks and enter the cave office on the left. Note the three circles on the drawing on the desk. Exit the cave and go round the corner to the elevator. Press the left green button to close the doors, open the central panel and press the orange button to go up.
Turn left and look down out of the window. Remember the image you saw in the dark room? Press the buttons to set the readout to L and N.
Exit the elevator and enter Kales' apartment.
On the desk is the picture you gave him right at the start of the adventure.
Pick up the messenger and press the middle button. Press play and listen to Kales. He tells you to find the black crystal. You will need 10 green crystals to do so. He also mentions finding a golden sphere.
Turn round and go into the bedroom on the left. Under the pillow is a book. You need to match the patterns in the book to the circles you saw in the cave office.
4 horizontal lines – hex and triangles.
3 horizontal and 3 vertical lines – crowns and asterisk.
2 horizontal and 1 vertical line – 8 point stars and diamonds.
Now pick up the piece of paper under the pillow.
Note the three rings and the spokes.
The crowns and asterisks intersect on the outer ring south.
The hexagons and triangles intersect on the middle outer ring southwest.
The 8 point stars and diamonds intersect on the inner outer ring northwest.
Step back and look at the crystal validator. Press the button and listen to the instructions from Kales.
Turn round and go out onto the balcony. A map of Rhem!

Return to the elevator and go down. Exit the elevator and go forwards. Turn round and look up. Note the grid with the number 4.
Enter the cave office
Examine the control panel on the desk. The first three buttons set lights on the three rings.
You need: Outer - south, middle - southwest, inner: northwest.
Press the forth button to open the panel. Collect the gold sphere. You now have 4 golden objects. Recall the 4 faces you saw in the lower rooms. Each had a symbol of one of the golden objects . In the cavern across from the 4 Storey Building was an elevator that took you up to 4 statues and were holding their hands out for something. Time to return.
THE STATUES
Exit the cave office and turn right. Go to the far door and press the red button. Enter the Mezzanine Building via the now opened door, turn left and go back outside. Through the hatch and into the lamps room. Take the north exit. Forwards, open the door wait for the light to come on and forwards to the elevator. It should be at the upper level. If not you need to go up, exit, down the ladder, across the drawbridge and back into the lamps room and out the north exit to the elevator.
Open the doors and climb down the ladder. Round the access corridor and into the small elevator. Go up one level. Exit and follow the path to the 4 storey building.
Into the building and press the button to raise the East Ladder. Climb the ladder in the alcove to level 2. Cross to the other side and press the button to lower the West Ladder. Cross the the east side and climb the ladder to level 3. Raise the elevator to Level 4 (going to need this later when we put all the leaves in the book).
Back down to Level 1 and cross to the west side. Open the door and cross the bridge. Open the door and go forwards to the elevator. Open the door, enter and press the button to go up. Turn round and face the statue.
Use the clues from the picture you saw in the lower rooms to place the objects in the waiting hands:

Since you are facing North you must be looking at the southern statue. Place the isocaeder in his hands and press the button to open his mouth. Take a look at book 3. On page 6 is an isocaeder with a pattern underneath. Press the teeth to match the pattern:

Turn left and go right. Turn right to face the West statue.
Place the sphere in his hands. The teeth clue here was on the picture of the man in the dark room. Press the teeth to match the pattern:

Turn left and go right. Turn right to face the North statue.
Place the rod in his hands. The teeth clue here was on the picture of George Washington. Press the teeth to match the pattern:

Turn left open the door and go right. Turn right to face the East statue.
Place the double cone in his hands. The teeth clue here was on the picture of skull in the dark room. Press the teeth to match the pattern:

Make your way back to the elevator entrance and turn right (W). Examine the tree. Listen to the sound of the bird (short short long) and take leaf F. You should have all 8 now.
Turn round, forwards and press the red button to reveal the box containing green crystal 6. That’s 7 we have now.
The door to the building at the north of the area is locked so it’s back to the elevator and down to the cavern. Exit the cavern and open the gate on the right. Down the manhole, turn right and climb the next ladder all the way to level 4. Cross the other side and enter the Secret Library.
THE SECRET LIBRARY
A long time ago you listened to the radio to get the bird sequence. This is the clue to the order the leaves are placed in the red book.
LLS - Page 1 - Leaf H
SLL - Page 2 - Leaf C
SSL - Page 3 - Leaf F
LLL - Page 4 - Leaf E
LSS - Page 5 - Leaf B
SLS - Page 6 - Leaf G
SSS - Page 7 - Leaf D
LSL - Page 8 - Leaf A
Once all the leaves are in the book, turn left and go round the corner. Press the button to open the door on the right and climb down the ladder.
Follow the tunnel and cross the bridge. On the other side is a cabinet containing Green Crystal 1.
Turn round and unlatch the door. This exits to the statue area.
Back across the bridge and climb back up to the Secret Library.
Exit the library and cross to the east side. Down the ladder into the manhole. Turn left, forwards and press the button to lower the ladder. Up the ladder and out the manhole.
Enter the 4 Storey Building and press the button to raise the East Ladder.
Time now to see if there is anything hidden beneath the statue elevator.
Cross to the west side and exit the building. Cross to the southern side and enter the cavern. Into the elevator and go up to the statues. Turn right (W) and open the door. Exit and go right. Forwards to the north exit, open the door and follow the tunnel back to the secret library.
Exit the secret library, and cross to the east side. Down the ladder into the tunnel. Left, forwards and press the button to lower the East ladder. Up the ladder and out of the manhole. Into the 4 Storey Building and cross to the west side. Exit the 4 Storey Building and enter the cavern. Forwards to the elevator. Do not call the elevator, just press the green button. Step inside and look to your right. Note the yellow squares and triangles.
Exit the cavern and enter the 4 Storey Building. Cross to the east side and raise the East Ladder. Climb the alcove ladder to Level 2 and up the East Ladder to level 3. Bring the elevator down to level 2 and use the East Ladder to get there.
Next job is to unravel those pictures of men and women you collected. The solutions will be used in the hallway down in the cavern below the reservoir. The easiest way to get there is via the ladder on level 2 of the 4 Storey Building.
Go to the side passage (on the north side), open the door at the end and climb down the ladder.
THE RESERVOIR CAVERN
Turn round and go out to the balcony. Pull the ring on the right to activate the machines (hear a bell).
Inside and enter the hall on the left. If you follow the conduit it begins with the machine on the left (W) of the doorway, then goes to the two machines on the right (E) and finishes with the machine at the other end on the left (W).
At the far end is a banner above the panel. Break the words up into triplets
GAF UPA CAL LUZ FYQ UAF APA AGY
They duplicate the syllables the men in the pictures were signaling. If you associate the syllables to signals to earrings you can press the buttons to replicate the earring patterns.
Simple really, the solution below is the order you press the buttons to get the earrings sequence (the tube fills from the bottom up).
Back to the entrance and turn right. GAF UPA – press: black, black white.
Turn round. CAL LUZ – press: white black white.
Go to the north end and turn right. FYQ UAF – press: black, black, black.
Turn round: APA AGY – press: black white white.
Turn right and press the button. Open the blue box to get Green Crystal 7.
All done here. Exit the hall and climb the ladder. Through the door and down the alcove ladder. Lower the East Ladder and exit the 4 Storey Building. Climb the ladder, down in the Circular Elevator, along the access tunnel and up the ladder. Call the Main Elevator, enter, left and across the drawbridge into the Lamps Room.
Exit via the East Door. Climb the ladder to the Upper Mezzanine Floor. Open the North Door and go out onto the balcony. Use the sequence you saw on the Middle Mezzanine balcony to set the AAA puzzle:
![]()
Double, bottom, top, top, double, top, bottom, double.
Press the orange button and a door closes. Back round the corner and note the drawing on the back of the door.
![]()
The sequence is reminiscent of the controls you saw on the doorframe leading to the Lower Mezzanine Floor. Go back and press the button to open the door and exit the Mezzanine building. Down the ladder and into the Lamps Room. Take the south exit and go through the hatch.
Turn left and examine the control panel on the door frame. Follow the sequence and press the green button. The train trundles off through the door.
THE UNDERGROUND RAILWAY
Go to where the train was. Open the hatch and climb down the ladder.
Turn round and note the patterns painted on the wall.
Turn left and enter the railcar. Press the left green button.
Clicking on the white squares turns then alternately black and white. The orange buttons reset the panel and the red buttons shows the number of clicks. Look at book 8 and on page 5 is the same patterns as those painted on the wall.
All you need to do is click each square the required number of clicks:

Press the red button to check your progress. When done, press the left green button to open the window and the right green button to start the train.
THE RADIO COMPOUND
When the train stops, get out and note the lever on the right. Forwards and open the panel at the end of the tunnel.
The big red button rotates the outer shell. The little red button rotates the airlock.
Make sure the outer shell opening faces the small red button. Go back to the train, turn round and pull the lever on the right. An elevator arrives. Step inside. Press the button to go up. At the top press the small red button top open the airlock. On the left is an inactive ring pull. Go back down. Exit and pull the lever to raise the elevator. Forwards, open the cabinet and align the inner and outer shells to face the airlock. Back to the lever and call the elevator. Go up, turn round and exit through the airlock.
On the north is a power control – the settings for which you don’t know yet but note the downwards pointing arrow on the distribution box.
On the south is a little panel that powers the ring pull in the elevator. Open the cover and press the button to get a ding and a green light.
Back to the elevator and pull the ring. You rumble round. Turn right and press the button to go down. You can now access the control panel. Press the red button to rotate the outer shell. Turn round and press the button to go up. Turn round and enter the Radio Compound.
Lots of things to examine. In particular note the 5 station boxes and speaker poles, the distribution box and the box next to the central building. At the South west corner of the compound is a large arch at the end of which is a sealed door with yet another 5 pointed star. Turn right (N) and enter the office.
Go the desk and look down. Open the left drawer and flip thorough the pages until you see a down pointing arrow. Note the power setting.
Drop the book and look right. Examine the drawing, note that you can isolate something. Put the drawing down, move the picture on the wall out of the way and pick up key D.
Time to turn on the power. Return to the elevator and go down. Open the cabinet and rotate the outer shell. Back up, pull the ring and go out through the airlock. Go north and open the control panel on the post. Set the readout to 72. Back into the elevator and pull the ring. Go down, open the cabinet and rotate the outer shell. Back up and into the Radio Compound. Round the path to the main door of the central building. Open the wooden box and fit Key D into the recess. Turn left and press the top button to open the panel next to the door.
There are 5 ‘dials’ and the buttons on the right of each can be set to 5 different pentagons. You need to find out which pentagon belongs to which dial.

 Wander
off round the compound and examine each station box. Click on the golden
indicator and count the number of bells. Press the button to hear the high
note. Move the lever back to the lower end of the scale and press the button
to hear the low note. Note the pentagon on the boards. Two of the boards
are broken but you know one of them from the drawing in the office and it’s
not too difficult to work out which on is missing
Wander
off round the compound and examine each station box. Click on the golden
indicator and count the number of bells. Press the button to hear the high
note. Move the lever back to the lower end of the scale and press the button
to hear the low note. Note the pentagon on the boards. Two of the boards
are broken but you know one of them from the drawing in the office and it’s
not too difficult to work out which on is missing
Back to the central building and open the panel next to the door. Set the pentagons and press the lower red button to open the door.
Inside are 5 panels that display the sound levels of each of the speakers when you press the button.
There are two panels that have ‘power’ arrows and a main panel that adds the sound levels from all the speakers when you press the button.
Record the sound level of each speaker. Now go outside and turn the levers on each station box back the other way. Return to the central building and record the sound levels at the other end of the scale.
Off to the office now to check the settings for the two power arrows in the central building. The one next to the main panel is 71 and the other is 70.
The problem here is to get a total sound level of first 71 and then 70 in order to open the panels.
These are my sound recordings:
| Bells | 1 | 2 | 3 | 4 | 5 |
| Low | 24 | 21 | 9 | 25 | 16 |
| High | 14 | 12 | 5 | 15 | 9 |
To get 71 we need to set the station boxes as follows:
| Bells | 1 | 2 | 3 | 4 | 5 |
| Position | H | L | H | H | L |
Which I reckon adds up to 71.
When all is set, return to the central Building and press the button to collect the sounds. If the readout stops at 71, press the orange button to open the panel. Collect the new key.
Outside, turn right and forwards to the isolator. Use the new key to open the cover and press the button to isolate station box 3.
We now need to set the remaining 4 boxes to get a sound level of 70:
| Bells | 1 | 2 | 4 | 5 |
| Position | L | H | L | H |
When all is set, return to the central Building and press the button to collect the sounds. If the readout stops at 70, go to the other panel, press the orange button and collect the last Green Crystal (hooray).
Return to the elevator, pull the ring and go down. Jump back into the train and press the green button on the right of the window to start the train.
THE BLACK CRYSTAL
At the next stop leave the train and examine the two boxes either side of the gate. One has an orange conduit and the other a green conduit. Inside is a dial and two buttons. You need to replicate the patterns you saw on the inner faces of the hatches:
Green:


Orange:


Back into the train and press the button on the wall to open the gate.
Through the gate and place a green crystal in each of the pedestals. Continue to do this with the rest of the crystals as each gate opens.
At the far end, wait for the elevator. Enter and press the button to go up.
Press the top button to hear a message from Meneandas. Press the lower button to open the panel. Collect the Black Crystal. All done.
Or is it?
If you have been noting the grids with numbers in then go back up. If not then its time to leave.
Open the little doors to the crystal housing and examine the panel with 16 buttons.
Use the grid clues and press the 4 buttons in the correct order:


On either side of you a panel opens.
The coloured squares need to be filled with the triangle patterns you have been collecting along with the corrections indicated on the back of the lower reservoir door:


There is a ding and the panel above the window opens. Press the button to go up.
Turn round and press the top button. Listen to Meneandas again then press the lower button to collect the vehicle key.
Turn round and go down. Turn round and go down again. Back into the train and press the green button on the right to start the train. At the next stop, exit and climb the ladder. Open the door to the Lower Mezzanine Floor, enter, open the south door and exit to the outer Rhem perimeter. Cross the track and round the corner to the elevator. Press the left green button to close the doors and the middle orange button to group.
Into the Kales apartment and go to the Crystal tester on the wall of the bedroom. Put the Black Crystal in the tester and listen to Kales. Take the Black Crystal and return to the elevator. Go down and this time press the right green button. Exit the elevator and enter the train. On the rear wall is a slot for your vehicle key. Turn round and press the flashing button.
Enjoy the journey.
When you stop, exit the train. Unlock and open the door. Enter the office and examine the master plans on the wall. Have a look through the photo albums – some good memories in there. Now look at the glyphs on the panel next to the doorway. On the master plans are the 4 glyphs you need.
Once they are set turn left and press the red button on the monitor cable. Listen to Kales. Behind your is another door with a 5 pointed keyhole…
That’s all there is folks. Back to the train now and say goodbye to
Rhem.
THE END
Obduction Scratches MystMyst II: Riven Myst III: Exile Myst IV: Revelation Myst V: End of Ages Uru - Ages Beyond Myst Uru - To D'ni Uru - Path of the Shell Dark Fall - The Journal Dark Fall - Light's Out Rhem Rhem 2 - The Cave Rhem 3 - The Secret Library Reah Schizm Riddle of the Sphinx The Omega Stone Amerzone Zork - Nemesis Zork Grand Inquisitor Hype - Time Quest
If you have found this walkthrough useful, discovered an error or have a suggestion then let me know: feedback.
![]()
